# Installing Trackingplan on your Websites Docs
DocsFor Websites
[All docs](/docs)
What is Trackingplan
- [Overview](/docs/overview)
The Trackingplan Way
- [Automonitoring](/docs/how-it-works)
- [Events](/docs/events)
- [Properties](/docs/properties)
- [User Attributes](/docs/user-attributes)
- [Pages](/docs/pages)
- [Acquisition](/docs/acquisition)
- [Platform Metrics](/docs/platform-metrics)
- [Automated Alert System](/docs/automated-alert-system)
- [Warnings & Updates](/docs/warning-and-updates)
- [Consent and Cookie Monitoring](/docs/consent-and-cookie-monitoring)
- [Pixel Monitoring](/docs/pixels-presence-monitoring)
- [Privacy Monitoring](/docs/data-privacy-monitoring)
- [Naming Conventions Monitoring](/docs/naming-conventions-monitoring)
- [Discover Releases](/docs/autodiscover-releases)
- [Data Validation](/docs/data-validation)
- [Deep Audits](/docs/deep-audits)
- [Digests](/docs/digests)
Getting Started
- [Installing Trackingplan](/docs/installing-trackingplan)
- [For Websites](/docs/installing-trackingplan/installing-trackingplan-on-your-websites)
- [Webhooks](/docs/installing-trackingplan/installing-trackingplan-using-webhooks)
- [For Apps](/docs/installing-trackingplan/installing-trackingplan-in-your-apps)
- [For ssGTM](/docs/installing-trackingplan/for-ssgtm)
- [Post-Install Warm-Up](/docs/post-install-warm-up)
Inside Trackingplan
- [Dashboard](/docs/dashboard)
- [Search](/docs/search)
- [Health Summary](/docs/health-summary)
- [Starred Items](/docs/starred-items)
- [Reports](/docs/reports)
- [Data Explorer](/docs/data-explorer)
- [Tracks Explorer](/docs/tracks-explorer)
- [Root Cause Analysis](/docs/root-cause-analysis)
- [Presence Map](/docs/presence-map)
- [Advanced Reports](/docs/advanced-reports)
- [Session Finder](/docs/session-finder)
- [Privacy Report](/docs/privacy-report)
- [Change History](/docs/change-history)
- [Settings & Members](/docs/settings)
- [Destinations](/docs/destinations)
How to…
- [Manage Warnings](/docs/warning-management)
- [Mute Warnings](/docs/mute-warnings)
- [Debug Warnings](/docs/debug-warnings)
- [AI Debugger](/docs/ai-debugger)
- [Attribution](/docs/attribution)
- [Customize Warnings](/docs/customize-warnings)
- [Ensure Privacy](/docs/ensure-privacy)
- [Cookies & Consent](/docs/cookies-consent)
- [Consent Mode](/docs/googles-consent-mode)
- [Privacy by Design](/docs/privacy-by-design)
- [Marketing Observability](/docs/enhance-marketing-observability)
- [Campaign Validation](/docs/campaign-validation)
- [Pixels Summary](/docs/pixels-summary)
- [Enhance Collaboration](/docs/enhance-collaboration)
- [Sharing](/docs/sharing)
- [Notes & Labels](/docs/notes-labels)
- [Personalized Digests](/docs/personalized-digests)
- [Extend detection](/docs/extend-trackingplans-detection-capabilities)
- [Tags](/docs/tags)
- [Chrome Extension](/docs/trackingplans-chrome-extension)
- [Data Layer Audit](/docs/data-layer-audit)
- [Explore your Data](/docs/explore-your-data)
- [Environments](/docs/environments)
- [Multi-Account Management](/docs/multi-account-management)
- [Plans Overview](/docs/plans-overview)
- [JSON Export/Import](/docs/export-import-json-schemas)
- [Split Destinations](/docs/split-destinations)
Others
- [Data Studio Connector](/docs/trackingplan-connector-for-data-studio)
- [Omnibug Extension](/docs/trackingplan-omnibug-extension)
- [Trackingplan Export API](/docs/trackingplan-export-api)
- [Trackingplan Exploration API](/docs/trackingplan-exploration-api)
- [Supported Trackers](/docs/supported-trackers)
- [SDK Update](/docs/sdk-update)
- [Release Notes](/docs/release-notes)
- [Privacy and Security](/docs/privacy-and-security)
[Getting Started](/docs) Updated July 14, 2026
# Installing Trackingplan on your Websites
Installing Trackingplan on your websites is as easy as using Google Tag Manager or directly copying the snippet onto your website.
> In this section:
>
> - Installing Trackingplan…
> - [Using Google Tag Manager](/docs/installing-trackingplan/installing-trackingplan-on-your-websites)
> - [Pasting the snippet on top of the](/docs/installing-trackingplan/installing-trackingplan-on-your-websites) `` [of your site](/docs/installing-trackingplan/installing-trackingplan-on-your-websites)
> - [How it Works](/docs/installing-trackingplan/installing-trackingplan-on-your-websites)
> - [Advanced options](/docs/installing-trackingplan/installing-trackingplan-on-your-websites)
> - [Set up Trackingplan with GA4 on Shopify](/docs/installing-trackingplan/installing-trackingplan-on-your-websites)
> - [Content Security Policies](/docs/installing-trackingplan/installing-trackingplan-on-your-websites)
The most common way to install Trackingplan is by using [Google Tag Manager](/docs/installing-trackingplan/installing-trackingplan-on-your-websites) or by directly [copying the snippet onto your website](/docs/installing-trackingplan/installing-trackingplan-on-your-websites).
## Using Google Tag Manager
If you are using [Google Tag Manager](/integrations/google-tag-manager), installing Trackingplan on your website can be done even without having access to your site’s code. Here is how:
1. Log in to Google Tag Manager.
2. Create a **New tag** inside the container connected to your website.
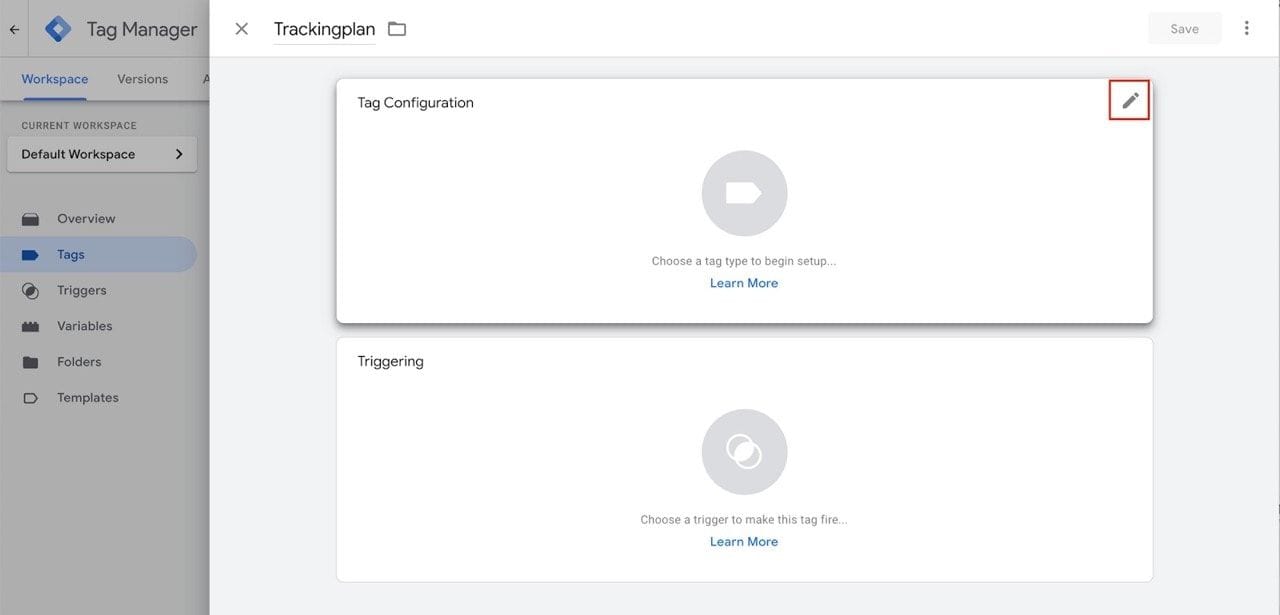
3. Hover over the Tag Configuration box and click on the **gray pencil** icon.
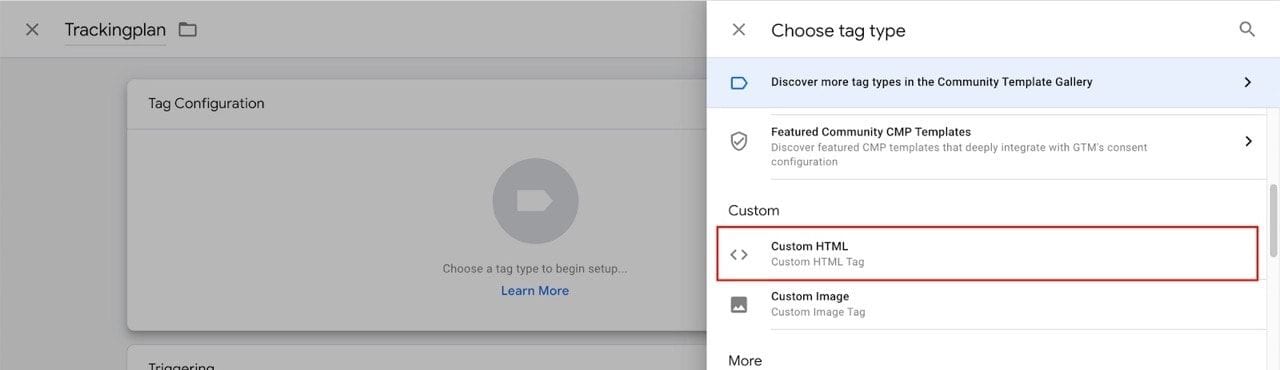
4. Next, you can choose the tag type. Select **Custom HTML Tag** as the tag type.
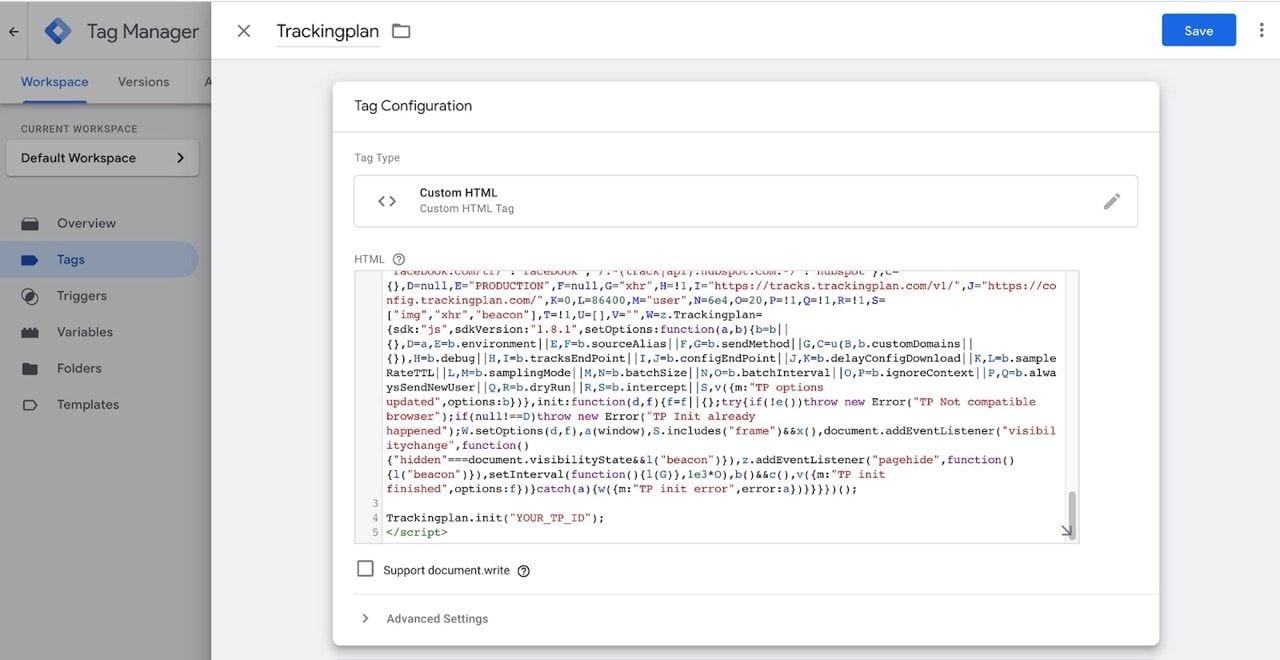
5. Now, let’s configure your tag. To do this, paste your Trackingplan snippet into the HTML text box in Google Tag Manager. Remember that you can always retrieve your snippet from https://app.trackingplan.com/plans/**”your TP\_ID”** /install
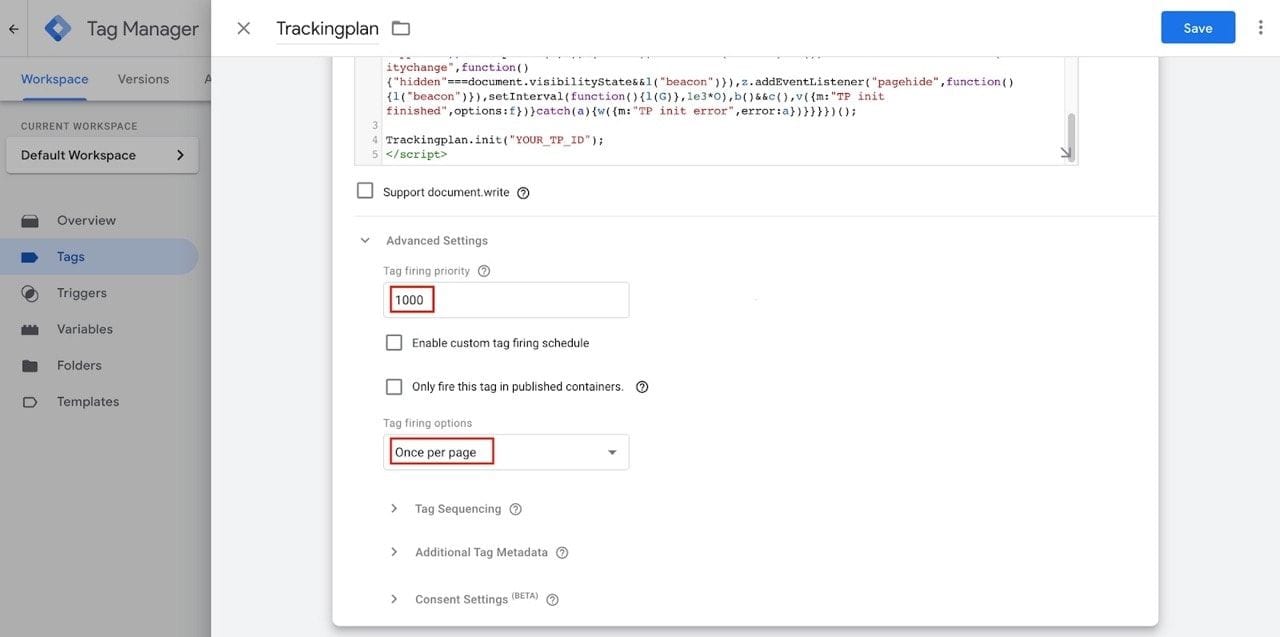
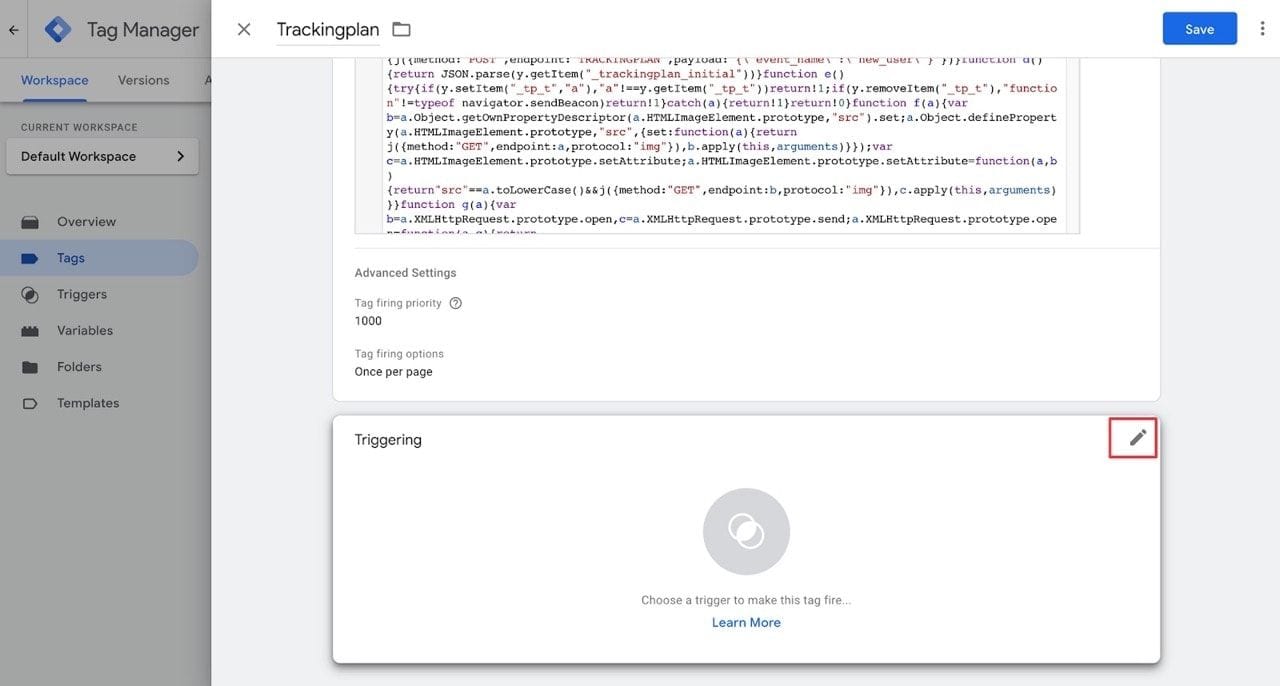
6. Then, set up your tag’s advanced settings. Click **Advanced Settings** and set ** Tag firing Priority** to ** 1000** and ** Tag Firing Options** to ** Once per page** to ensure Trackingplan can see events that trigger once the page has loaded.
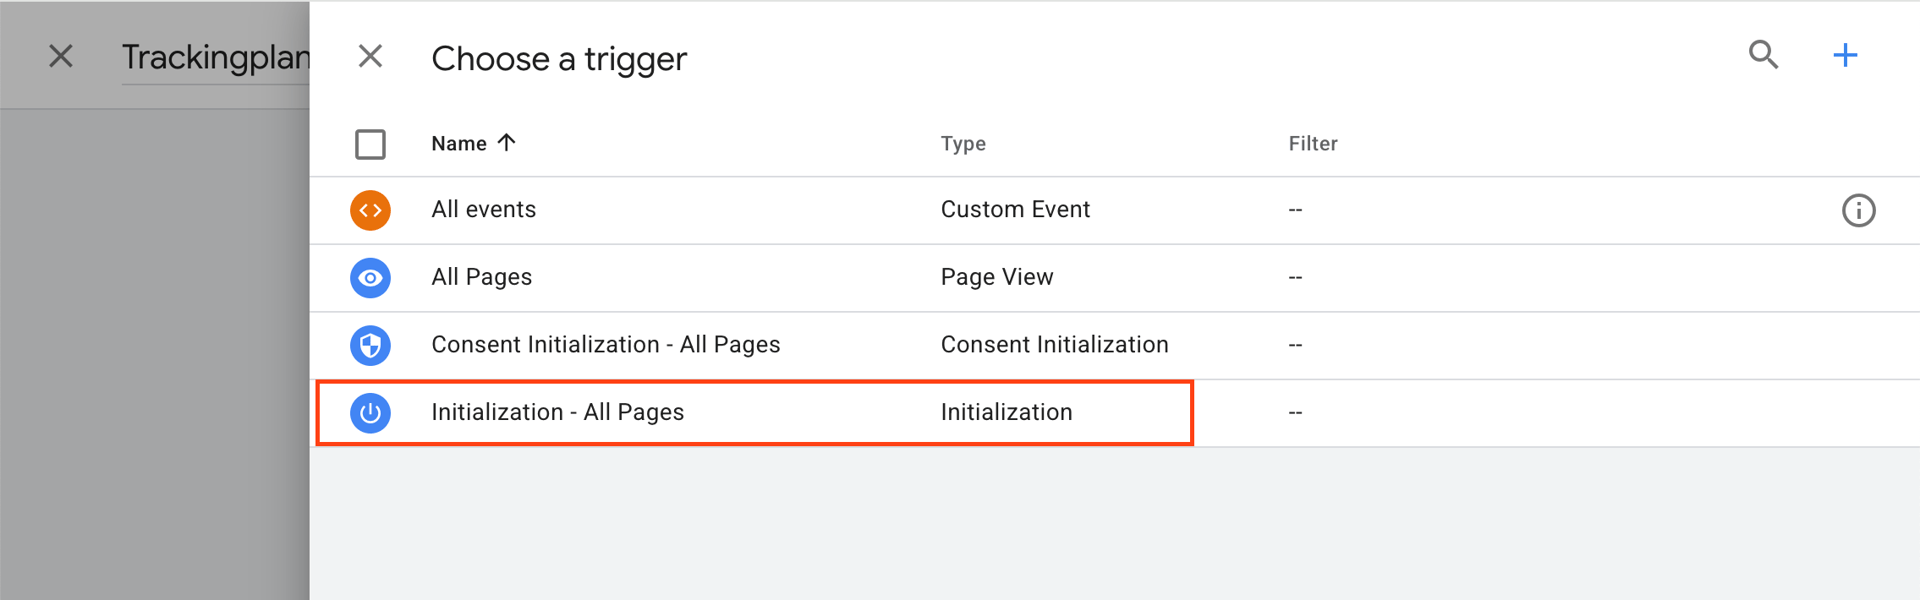
7. Next, navigate to the Triggering box and click on the **gray pencil** icon to choose a trigger. For the best results, select ** Initialization - All Pages.**
8. Once saved, Trackingplan will load on any page where the Google Tag Manager container script is installed. Remember to **Submit** your changes!
> All done! After this easy installation, don’t forget to [verify that data collection is working](/faqs/how-can-i-validate-trackingplan-is-collecting-data-after-its-installation) to ensure Trackingplan is automatically monitoring and documenting all the customer data you are using for your analytics, marketing, and sales.
### GTM Tip: Track GTM Version and ID as a Custom Dimension (Optional)
> Any data tagged in your GTM can be added to the Trackingplan script using [tags](/docs/tags) to extend Trackingplan's detection capabilities.
In this sense, to be able to later attribute warnings to configuration changes, show them as releases, and see them in RCA, we recommend you send **GTM’s Container Version as tags.**
The container version label is standard and can be included just as in the example below.
```
tags: {
...
"gtm_container_version": "{{Container Version}}"
...
}
```
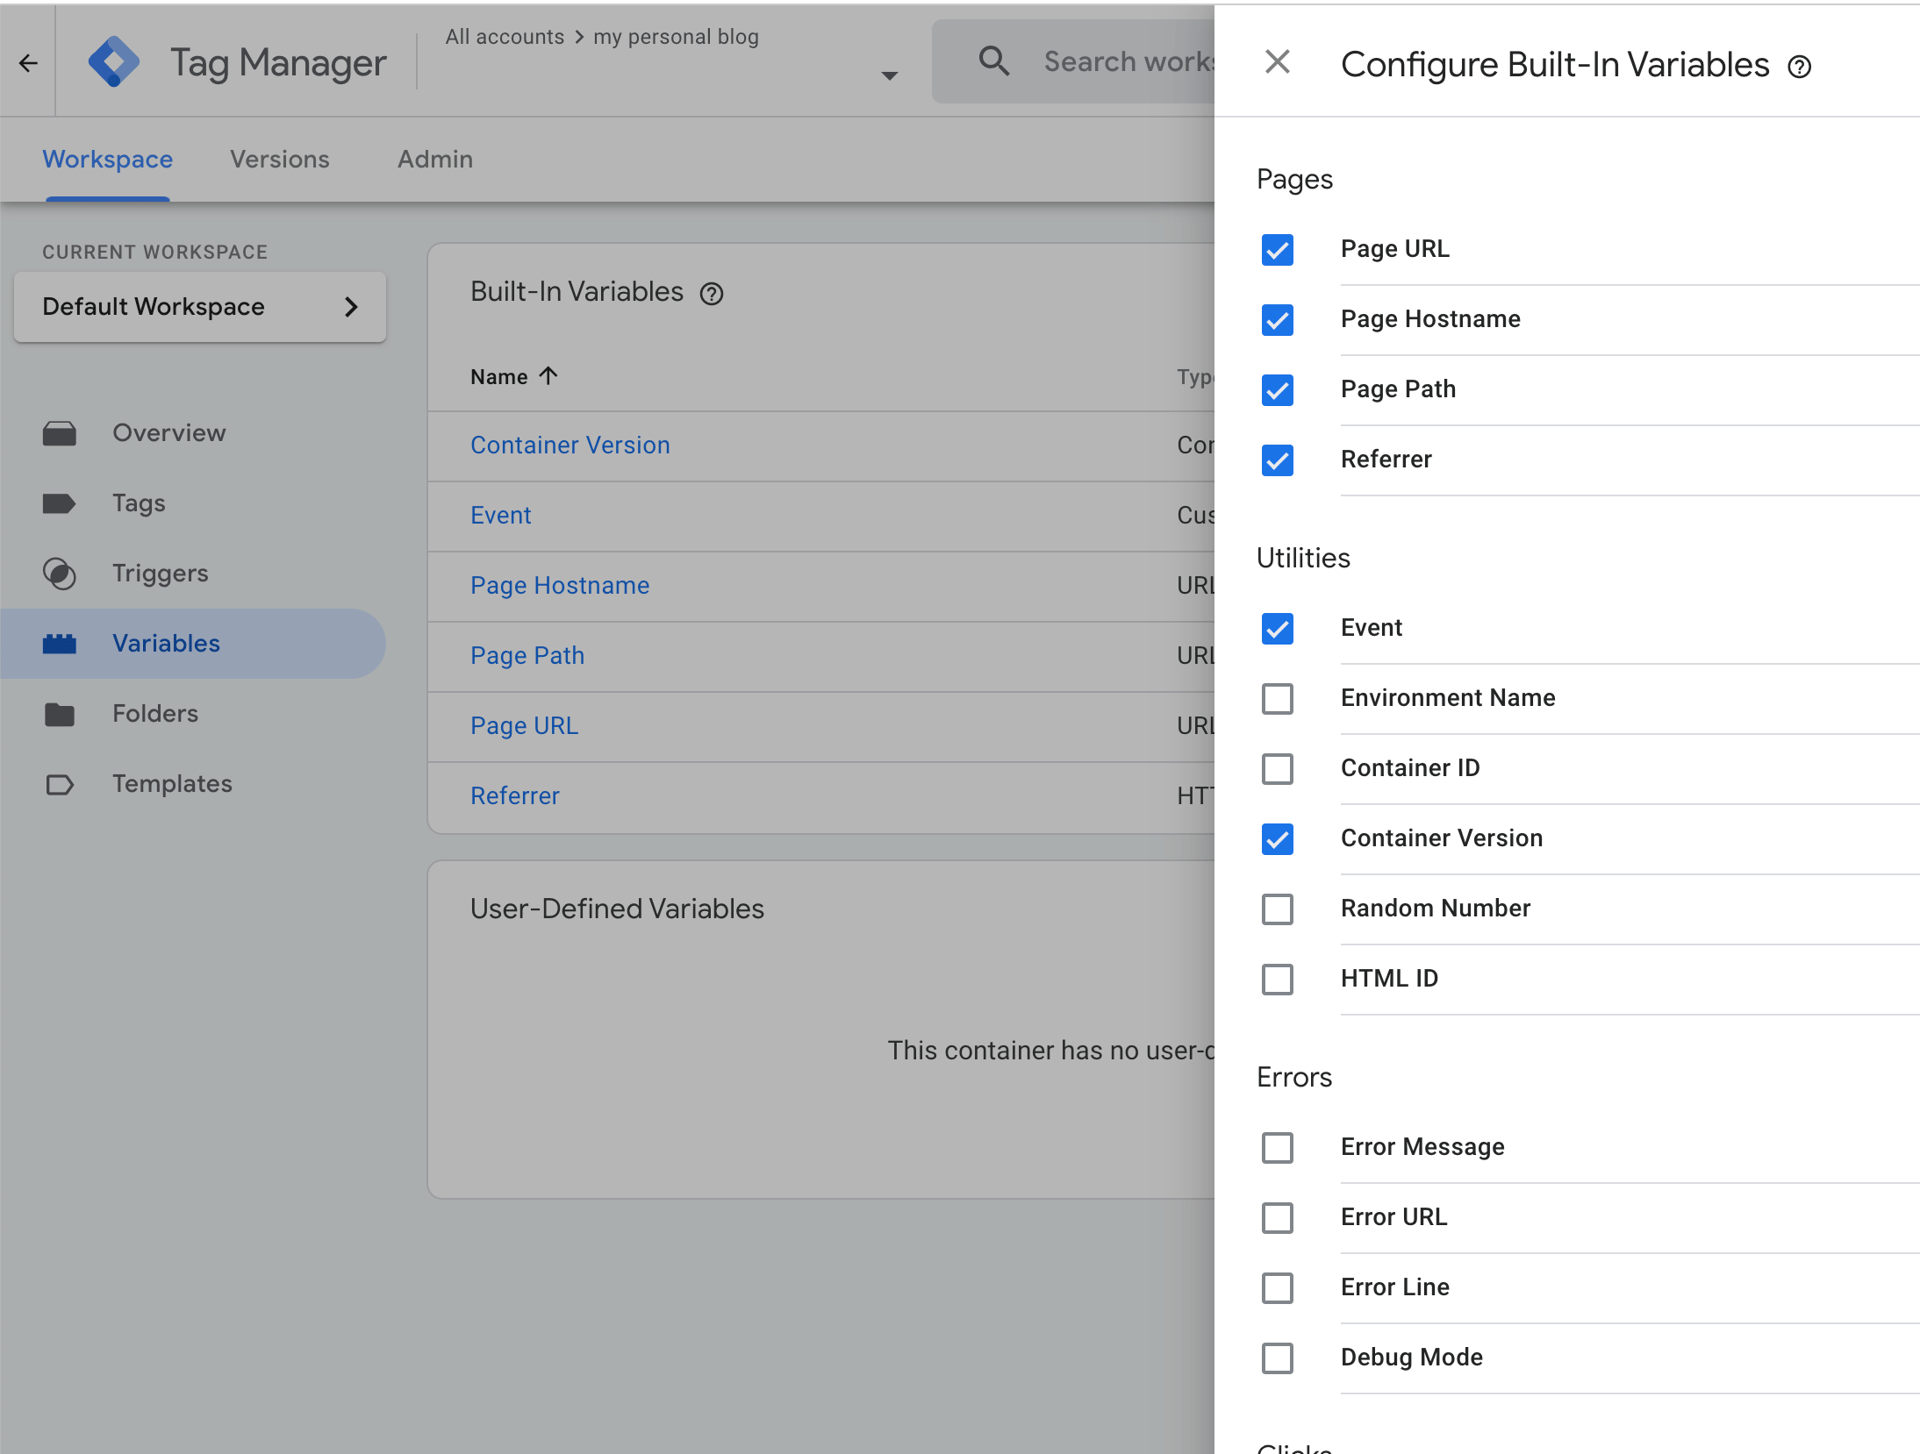
Moreover, if you use multiple GTM containers, you can also add the **Container ID as a tag**. For it, you will need to configure it in GTM first, as indicated in the picture below.
## Add Trackingplan’s Snippet to Your Site
You can also install Trackingplan by adding our snippet to your site. This is how:
> **Note:** If you are not using a content management system (CMS) like Webflow or WordPress, we recommend asking a developer to add the snippet to your pages. Incorrect installation will prevent Trackingplan from detecting relevant data.
1. Retrieve your snippet from `https://app.trackingplan.com/plans/``”your TP_ID”``/install`
```javascript
```
2. Paste the snippet into the top of the `` section of all of your pages, **before any other analytics snippets or tracking codes.**
Once installed and after [verifying that Trackingplan is collecting data correctly](/faqs/how-can-i-validate-trackingplan-is-collecting-data-after-its-installation) Trackingplan will automatically verify the data you send to your third-party services without modifying or slowing anything down.
## How it Works
This will ensure your tracking plan is always updated and any inconsistencies or errors can be easily identified. Trackingplan SDK attaches a *listener* to all the remote tracking requests emitted by your analytics providers’ SDKs. This listener works in the background as non-blocking and, therefore, does not interfere with the original request that the provider's client makes.
The technical procedure for listening to the requests is very simple: The JavaScript methods used to make the requests are wrapped by our code. This way, when the analytics services use them to send the tracking info, two things happen:
1. First, the original action is performed (i.e. the request is sent to the analytics provider).
2. In a non-blocking manner, and only if the request URL matches with a known analytics services domain, the request is forwarded to our server.
Here’s what our script listens to, which includes the three most typical methods used to communicate with analytics providers:
- XHR: by wrapping the `XMLHttpRequest.open` and `XMLHttpRequest.send` functions
- Pixels: by wrapping the `HTMLImageElement.prototype.setAttribute` function
- Beacons: by wrapping the `navigator.sendBeacon` function
> Note that the used implementation is similar to the one used in your actual analytics providers, and also employed in the case of browser extensions, testing suites, and debugging tools.
## Advanced options
Trackingplan’s `init` call can also receive an `options` dictionary, allowing you to set some advanced parameters to differentiate between sources, environments, and custom domains, or enhance Trackingplan’s debugging capabilities.
| | | | |
| --- | --- | --- | --- |
| **Parameter** | ** Description** | ** Default value** | ** Example** |
| `sourceAlias` | Allows to differentiate between sources | `Javascript` | `"TrackingplanWEB"` |
| `environment` | Allows to isolate the data between production and testing environments | `PRODUCTION` | `DEV` |
| `customDomains` | Allows to extend the list of monitored domains. Any request made to these domains will also be forwarded to Trackingplan. Only define a custom domain if your analytics or marketing platform sends data to a non-standard endpoint (for example, a server-side tagging setup or a vendor configured with your own domain). Learn more about [custom domains](/docs/installing-trackingplan/installing-trackingplan-on-your-websites). | `{}` | `{"cusomdomain.com/data/": "ssgtm"}` |
| `getDataLayer` | Allows you to capture a real-data representation with browser-captured context, acting as a bridge between your website or applications and various analytics tools and facilitating the seamless transfer of essential data. If your data layer isn’t named `DataLayer` (e.g.: `customDataLayer`) be sure to specify the correct variable name accordingly. | `empty` | `function(){ return window.VARIABLE_NAME; }` |
| `debug` | Shows Trackingplan debugging information in the console | `false` | `true` |
| `tags` | [Tags](/docs/tags) allow you to label the data you send to Trackingplan. These are completely customizable, enabling you to distinguish your warnings by their `release version`, `build number` `app version`, `test name`, etc., debug and perform root-cause analysis on your warnings, or break down event traffic by the values of your tags (`country`, `pageType`, etc.) | `empty` | `{"country": "us"}` |
| `usePrivacy` | Makes Trackingplan automatically encrypt any detected personal data in Trackingplan’s privacy report. | `true` | `true` |
All you need to do to set up tags is to add the following `init(...)` parameter in the Trackingplan’s snippet you already used to install Trackingplan in your site code or your Google Tag Manager:
```javascript
Trackingplan.init(..., {
"tags": {
"tagName1": "tagValue",
"tagName2": "tagValue",
...
}
})
```
After this easy setup, all the traffic that will arrive at Trackingplan from your sites and apps will be labeled with these customizable tags.
### Using Custom domains
Trackingplan automatically recognizes requests sent to the standard collection domains used by supported analytics and marketing platforms. Those domains are mapped to Trackingplan parsers, which transform the raw requests into the enriched event format used throughout the platform.
However, if your implementation sends data to a custom collection domain instead of the platform's default one, Trackingplan won’t be able to identify it automatically. In that case, you must **configure the custom domain** during Trackingplan’s installation.
When configuring a custom domain, you'll need to provide:
- **The custom domain** that your implementation sends requests to (for example, your own collection domain instead of the platform's default endpoint).
- **The parser ID** that tells Trackingplan which platform those requests belong to.
> The parser value is **not** the name that will appear in Trackingplan. It is the internal parser identifier that tells Trackingplan how to interpret requests coming from that domain.
Some common parser IDs include:
| Platform | Parser ID |
| --- | --- |
| Server-side Google Tag Manager | `ssgtm` |
| Stape | `stape` |
| Tealium | `tealium` |
| Adobe Analytics | `adobe` |
| Adobe Target | `adobe_target` |
| Jentis | `jentis` |
| Piano | `piano` |
If you're unsure which parser ID to use, reach out to the [Trackingplan team](mailto:support@trackingplan.com) and we'll be happy to help.
### Set up Trackingplan with GA4 on Shopify
> Now that the native **Settings** integration for Google Analytics 4 (GA4) is no longer available in Shopify, we recommend using a ** custom pixel** to ensure Trackingplan can capture data beyond the checkout phase.
**Step 1: Create a Google Tag Manager Custom Pixel**
1. Open your **[Google Tag Manager](https://tagmanager.google.com/)** account, and select the account that you want to set up a custom pixel with.
2. Click **Admin**, and then click ** Install Google Tag Manager** to open the installation code.
3. Copy the code block that belongs in the *`head`* section of a page.
4. Remove the HTML tags from the code block. For example, ``.
5. Go to **Custom Pixels** in your Shopify admin (you can access it [here](https://admin.shopify.com/store/trackingplandev/settings/customer_events?type=CUSTOM)) and insert the remaining code into a new ** Shopify Custom Pixel**.
**Step 2: Add Trackingplan SDK**
6. Then, place the Trackingplan SDK snippet directly **at the top of all your custom pixels**. Use the snippet below, replacing `YOUR_TRACKINGPLAN_ID` with the ID from your Trackingplan account. We also recommend you change `script.async` and set it to `false` to ensure it loads first:
````
```
(function() {
const script = document.createElement('script');
script.src = 'https://cdn.jsdelivr.net/gh/trackingplan/trackingplan.js@latest/trackingplan.min.js';
script.async = false;
script.onload = function() {
Trackingplan.init("YOUR_TRACKINGPLAN_ID", {
environment: "PRODUCTION",
tracksEndPoint: "https://eu-tracks.trackingplan.com/v1/",
// Uncomment and customize the line below if you want to set tags
// tags: { "gtm_container_version": "{{Container Version}}" }
});
};
document.head.appendChild(script);
})();
```
````
Since the global Shopify `dataLayer` is not available in **Custom Pixels**, `localStorage` provides a reliable way to store and retrieve data within the sandboxed checkout environment, similar to cookies and consent mode. In this regard, if you'd like to share additional data (e.g., the Data Layer) from your website to the checkout phase, you can use `localStorage`.
> For detailed guidance on how to pass consent mode data effectively, we recommend checking out this article: [Shopify Checkout Extensibility](https://www.makingscience.co.uk/blog/shopify-checkout-extensibility/). Also, for more information on how to create a custom pixel with GTM and GA4 in Shopify, visit [Shopify’s official documentation](https://help.shopify.com/en/manual/promoting-marketing/pixels/custom-pixels/gtm-tutorial).
## Content Security Policies
[Content Security Policies](https://content-security-policy.com/) are delivered as a header to your users' browsers by your web server and are used to declare which dynamic resources are allowed to load on your page.
For many websites, this is often as straightforward as declaring that only scripts/styles from your domain and the tools you use are allowed. However, this can become more intricate when complex setups are in play.
Trackingplan only connects to two subdomains, `config.trackingplan.com` and `tracks.trackingplan.com` (or `eu-tracks.trackingplan.com` depending on your assigned datacenter), and doesn’t execute code directly from any of them.
If you are using a default Content Security Policy (CSP), add `*.trackingplan.com` to your `script-src` policy.
```
default-src ... *.trackingplan.com 'unsafe-inline'
```
If you want stricter restrictions, add `*.trackingplan.com` to your `connect-src` policy. We recommend the template below to ensure your policies are more future-proof. Here's an example of what that would look like:
```
connect-src ... *.trackingplan.com
```
Do you have more questions? Problems? Need more info? We can help! [Contact us](mailto:support@trackingplan.com) and we’ll get back to you as soon as possible.
[← Previous**Installing Trackingplan**](/docs/installing-trackingplan) [Next →** Installing Trackingplan using Webhooks**](/docs/installing-trackingplan/installing-trackingplan-using-webhooks)
Was this useful? Write to [support@trackingplan.com](mailto:support@trackingplan.com)
On this page
1. [*01*Using Google Tag Manager](#using-google-tag-manager)
2. [*02*Add Trackingplan’s Snippet to Your Site](#add-trackingplan-s-snippet-to-your-site)
3. [*03*How it Works](#how-it-works)
4. [*04*Advanced options](#advanced-options)
5. [*05*Content Security Policies](#content-security-policies)