
Adobe Launch Utilization
Adobe Launch is a pivotal tool for effective tag management in the Adobe ecosystem, offering unique benefits compared to other tag management systems. With its tight integration with Adobe Analytics, extensive customization options, and powerful tagging capabilities, Adobe Launch offers unmatched precision and scalability for campaign tracking. This powerful tool enables digital analysts to streamline their campaign tracking setups by managing tags, rules, and integrations in a centralized environment. By adhering to Adobe Analytics best practices, you can create an implementation that is both highly efficient and scalable to meet future demands.
Overview of Adobe Launch
Adobe Launch simplifies the deployment of tracking codes and reduces dependency on IT teams. It supports dynamic tagging capabilities, making it an essential component for campaigns requiring frequent updates or custom configurations.
Setting Up Tags and Rules
A proper tag setup starts with defining the objectives of your campaign. Once objectives are clear, use Adobe Launch to:
- Create data elements that capture user interactions.
- Set rules that trigger tags based on specific conditions.
- Test and validate deployments to ensure accuracy.
Use Cases for Launch Extensions
For e-commerce campaigns, Launch Extensions like the Product String tool can significantly enhance your tracking. These extensions enable advanced tracking scenarios such as monitoring product-level interactions and mapping them to sales outcomes.
Advertising Data Integration
Integrating advertising data into Adobe Analytics is a critical step in ensuring the accuracy and depth of your campaign tracking. When done effectively, this integration provides a comprehensive view of your advertising efforts, allowing you to evaluate performance across platforms and align your strategy with business objectives.
Connecting Advertising Platforms
Adobe Analytics supports seamless integration with major advertising platforms like Google Ads and Facebook Ads. By linking these platforms, you can:
- Track ad impressions, clicks, and conversions directly within Adobe Analytics.
- Analyze user journeys from ad engagement to site interactions.
- Compare performance across multiple advertising channels.
Addressing Common Challenges
Advertising platforms and Adobe Analytics often present challenges like discrepancies in metrics or delayed data updates when syncing data. To mitigate these issues:
- Establish consistent naming conventions for campaigns.
- Regularly audit your data to identify and resolve mismatches.
- Utilize Adobe’s built-in tools to validate incoming advertising data.
Leveraging Calculated Metrics
One of the most powerful features of Adobe Analytics is its ability to create calculated metrics. For example, 'Customer Lifetime Value' (CLV) is a widely used calculated metric that provides insights into the total revenue a business can expect from a single customer over their lifetime. By combining average order value, purchase frequency, and customer retention rates, CLV helps analysts make informed decisions about marketing spend and resource allocation. For advertising campaigns, these metrics can be used to:
- Evaluate ROI by combining cost data with conversion metrics.
- Monitor the efficiency of ad spend through cost-per-acquisition calculations.
- Identify high-performing ads and optimize resource allocation.
For more advanced strategies on integrating advertising data, refer to our comprehensive Adobe Analytics guide. Additionally, Adobe’s resources on ad platform integration provide valuable insights for troubleshooting and setup optimization.
Alerts Setup for Campaign Monitoring
Setting up alerts in Adobe Analytics is an essential practice for proactive campaign tracking. By configuring tailored notifications, you can quickly detect and address performance anomalies, ensuring your campaigns remain optimized and aligned with goals.
Best Practices for Alerts
Digital analysts identify key performance indicators (KPIs) relevant to their campaigns to create effective alerts. Use Adobe Analytics best practices to configure alerts that:
- Highlight unusual spikes or drops in traffic.
- Notify you of significant changes in conversion rates.
- Detect errors in data collection or missing tags.
For a more dynamic approach, consider integrating KPI warnings from tools like Trackingplan’s KPI Warnings feature. This feature complements Adobe Analytics by providing proactive notifications on key metrics, ensuring issues are identified and addressed promptly.
Common Alert Configurations
Some recommended alert setups include:
- Traffic spikes: Monitor unexpected surges that might indicate viral content or potential bot activity.
- Conversion drops: Identify sudden decreases in goal completions to address technical or UX issues.
- Revenue deviations: Track unexpected dips or peaks in e-commerce performance.
By implementing these strategies, you can stay ahead of issues and maintain data integrity. For additional insights into advanced alert configurations, explore our detailed guide on enhancing Adobe Analytics campaigns.
Calculated Metrics Creation
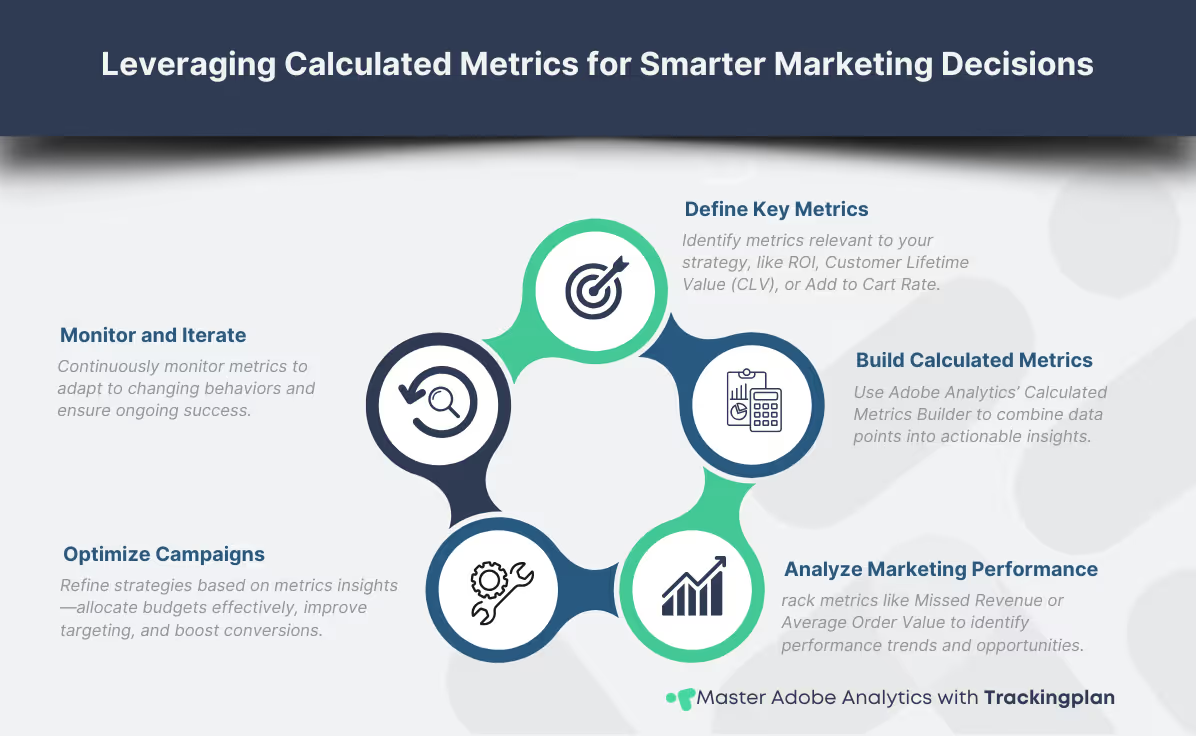
Custom metrics are a cornerstone of effective campaign tracking in Adobe Analytics. They allow analysts to tailor data analysis to specific business objectives, providing more actionable insights than out-of-the-box metrics. Additionally, calculated metrics offer significant benefits for custom reporting by enabling precise and tailored insights. Compared to standard metrics, calculated metrics can be customized to reflect unique business goals and challenges, making them an essential tool for any data-driven strategy. For instance, metrics like 'Missed Revenue,' which estimates potential earnings from unconverted traffic, or 'Add To Cart Rate,' a measure of how often users add items to their cart relative to views, can offer deep insights into user behavior and campaign effectiveness.
Why Custom Metrics Matter
Standard metrics often fall short when analyzing the unique complexities of individual campaigns. Custom metrics, like ROI or average order value, help bridge this gap by offering insights tailored to your strategy. These metrics enable you to:
- Pinpoint the performance of specific campaign elements.
- Compare the efficiency of different marketing channels.
- Focus resources on high-impact areas for improved ROI.
Creating Custom Metrics in Adobe Analytics
To set up calculated metrics effectively:
- Define Your Goals: Start by identifying the key performance indicators (KPIs) your campaign aims to achieve. Determine which metrics will provide actionable insights for your specific business objectives.
- Use the Calculated Metric Builder: Access Adobe Analytics’ intuitive interface by navigating to Components > Calculated Metrics. Here, you can:some text
- Select source metrics to use as the foundation of your calculation.
- Apply mathematical functions (e.g., sum, average, or custom formulas) to create meaningful combinations of data points.
- Add filters to refine your metrics further, such as segmenting by specific campaigns or user behaviors.
- Validate and Test: Ensure accuracy by:some text
- Comparing the new calculated metrics against historical data to check for consistency.
- Running real-time tests to ensure the metrics respond correctly to live data.
- Reviewing visualizations to confirm the metrics align with your intended goals.
- Save and Share: Once validated, save the calculated metric and share it with relevant stakeholders. Use descriptive names and annotations to ensure clarity and ease of use across teams.
Adding detailed steps like these helps streamline the process, empowering analysts to confidently build metrics like "Missed Revenue" or "Add To Cart Rate," which can drive more targeted insights and impactful decision-making.
Expanding your calculated metrics arsenal with examples like 'Missed Revenue' and 'Add To Cart Rate' not only enhances your campaign tracking capabilities but also ensures that your analyses provide actionable, precise insights. To explore advanced techniques for calculated metrics, refer to our step-by-step implementation guide.
Calendar Customization for Campaign Reporting
Calendar customization is a crucial feature in Adobe Analytics for aligning reports with specific campaign timelines. By tailoring the reporting periods to your unique needs, you can gain a clearer view of performance trends and make data-driven decisions with greater accuracy.
Setting Up Custom Calendar Dates
You can define custom date ranges in Adobe Analytics to correspond to the start and end of your campaigns. This capability ensures that your analysis focuses on the precise period of interest without being diluted by unrelated data. To set this up:
- Navigate to the report suite settings within Adobe Analytics.
- Define custom date ranges that align with your campaign durations.
- Save these settings to use them consistently across future reports.
Benefits for Seasonal and Recurring Campaigns
Custom calendars are particularly beneficial for campaigns that follow seasonal patterns or recur periodically. For instance, analyzing Black Friday or holiday promotions becomes more straightforward when your reporting aligns perfectly with these specific timeframes. Additionally, this approach helps track the performance of recurring events year over year, enabling you to identify trends and refine strategies.
By implementing Adobe Analytics best practices in calendar customization, you can ensure your campaign reporting remains focused and actionable. This small but impactful adjustment enhances your ability to derive insights that drive continuous improvement.
Sharing Data Across Experience Cloud
Seamless data sharing across Adobe Experience Cloud applications can greatly enhance the effectiveness of your campaign tracking strategies. By integrating Adobe Analytics with tools like Adobe Experience Manager, Adobe Target, Adobe Audience Manager, and Adobe Experience Platform, you can create unified customer experiences and drive better results.
How to Share Data Across Experience Cloud Applications
Adobe’s seamless integration enables data sharing across its Experience Cloud suite. To get started:
- Connect Adobe Analytics with Adobe Experience Manager (AEM): Share insights to optimize content delivery based on user behavior and preferences.
- Integrate Adobe Target (A4T): Use analytics data to create personalized experiences, from A/B testing to dynamic content adjustments. This bidirectional integration ensures accurate targeting and better campaign performance.
- Leverage Adobe Audience Manager: Enrich your segments with data from various sources, creating a unified view of customer behavior that drives precise targeting and personalization.
- Utilize Adobe Experience Platform (AEP): Share data and segments to unify reporting and gain comprehensive insights across the customer journey.
Use Case Examples
- Personalized Retargeting: Combine Adobe Analytics insights with Adobe Target’s capabilities to create dynamic retargeting campaigns tailored to user preferences and actions.
- Content Optimization: Use Adobe Experience Manager data to test and refine landing page elements, ensuring alignment with audience behaviors identified in Adobe Analytics.
- Unified Segments for Campaigns: Integrate Adobe Audience Manager to merge audience data from multiple platforms, enhancing the precision of marketing strategies.
- Comprehensive Analytics Reporting: Share data with Adobe Experience Platform to streamline reporting and create a holistic view of performance.
By implementing these strategies, you streamline data integration across the Experience Cloud, enabling deeper insights and creating more cohesive customer journeys. For a comprehensive look at Experience Cloud integration, explore our advanced Adobe Analytics guide.
Event-Driven Data Layer Strategy
An event-driven data layer strategy is pivotal in enabling dynamic and flexible tracking for your digital campaigns. By aligning interactions with specific data layer events, you can improve the accuracy and depth of your campaign tracking while streamlining data collection processes.
Why Event-Driven Data Layers Matter
Event-driven data layers act as the backbone of a robust analytics setup. They allow you to capture and organize user interactions in real-time, enabling smoother integration with tools like Adobe Analytics. By focusing on Adobe Analytics best practices, you can ensure that data is structured and actionable, eliminating the risks of incomplete or redundant tracking.
Mapping Campaign Interactions to Data Layers
To effectively implement an event-driven approach:
- Define Key Interactions: Identify critical touchpoints in your campaigns, such as form submissions, product views, or CTA clicks.
- Configure Data Layer Events: Create unique events in the data layer to capture these interactions. Include variables like user ID, campaign source, and interaction type.
- Integrate with Adobe Analytics: Map the configured data layer events to Adobe Analytics variables, ensuring seamless data flow.
Practical Applications
For example, in an e-commerce campaign, event-driven data layers can capture product details during an "Add to Cart" action, enabling precise tracking of user intent and conversion paths. Similarly, for lead-generation campaigns, data layers can record form inputs and submission times, offering deeper insights into user engagement.
To delve deeper into optimizing your data layer strategies, explore our resources on GA4 data layers and Tealium best practices. These guides provide complementary techniques to elevate your analytics framework further.
Adobe Launch Extensions for Product String
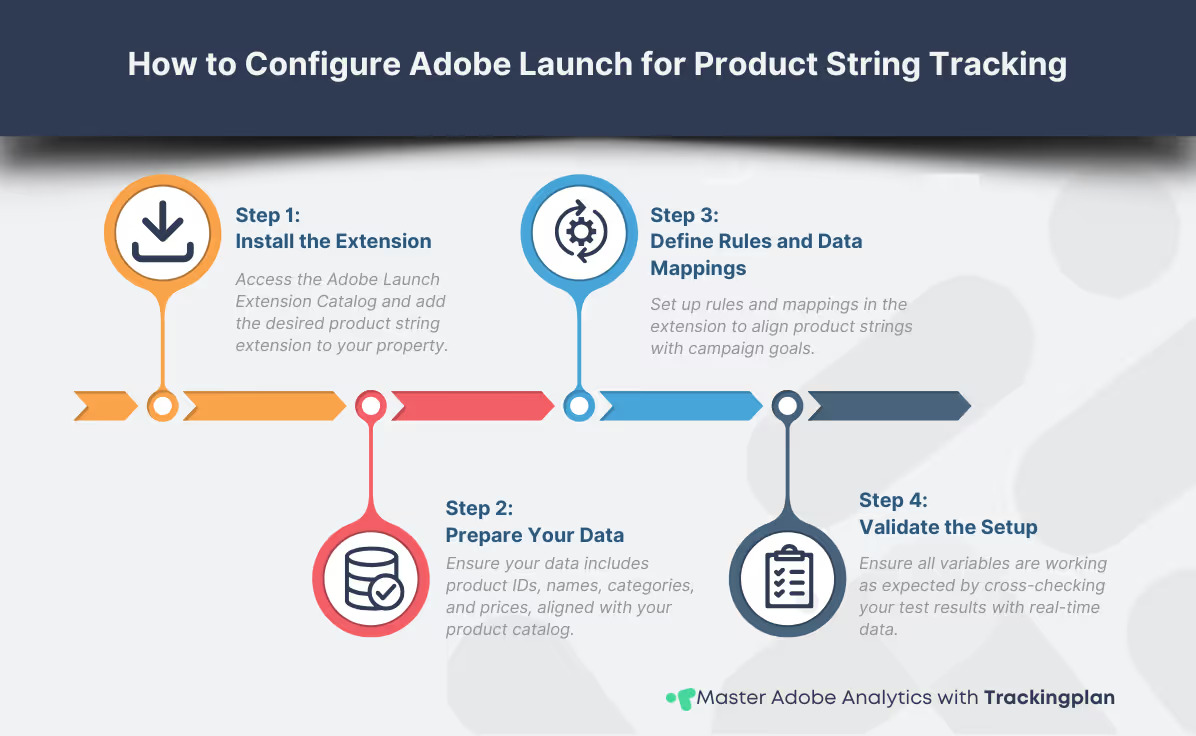
Digital analysts use Adobe Launch extensions to simplify product string tracking, enabling easier monitoring of product-level performance. For example, in dynamic pricing campaigns, these extensions allow you to adjust pricing variables in real-time, ensuring accuracy and responsiveness to market changes. Key benefits include:
- Enhanced tracking of user behaviors, such as adding products to carts or completing purchases.
- Greater flexibility in configuring dynamic e-commerce variables.
- Improved accuracy in attributing conversions to specific product actions. Key benefits include:
- Enhanced tracking of user behaviors, such as adding products to carts or completing purchases.
- Greater flexibility in configuring dynamic e-commerce variables.
- Improved accuracy in attributing conversions to specific product actions.
Why Use Launch Extensions for Product Strings?
Using Launch extensions for building the product string simplifies the implementation of the s.products variable, ensuring accurate and efficient product tracking. This approach eliminates manual errors and streamlines the process of capturing product-level data.
Available Product String Extensions
- AA Product String Builder: This extension is noted as the most comprehensive tool for constructing product strings in Adobe Analytics. It simplifies the configuration process, supports dynamic data mapping, and ensures compatibility with various e-commerce setups.
- Custom Product Extensions: For unique tracking requirements, Adobe Launch also supports custom-built extensions, allowing for highly tailored implementations.
Steps to Implement Using Launch Extensions
- Install the Extension: Access the Adobe Launch Extension Catalog and add the desired product string extension to your property.
- Configure the Extension: Define rules and data mappings to align the product string with your campaign objectives.
- Validate the Setup: Use Adobe Debugger or similar tools to test the s.products variable in real-time.
To explore a step-by-step approach to Adobe Launch, check out our detailed guide on implementation techniques.
Advanced Features for E-commerce Campaigns
E-commerce campaigns require a tailored approach to analytics. Adobe Analytics offers powerful features, such as merchandising eVars, product cost imports, and Launch extensions for product strings, that help track user behaviors and optimize sales strategies effectively.
Leveraging Merchandising eVars
Merchandising eVars enable advanced tracking of product interactions, such as impressions and clicks. By assigning specific eVars to product data, analysts can:
- Monitor product performance at the granular level.
- Analyze user interactions across various sales funnels.
- Gain insights into which products drive conversions and revenue.
Using Adobe Analytics best practices, you can configure eVars to capture dynamic data points, ensuring that your campaigns are backed by precise and actionable insights.
Importing Product Costs for ROI Analysis
Importing product costs into Adobe Analytics is a crucial step for enhancing financial analysis and reporting. This process enables businesses to calculate profit margins, optimize pricing strategies, and evaluate the ROI of their campaigns with greater precision.
Steps to Import Product Costs
- Prepare the Cost Data: Ensure your cost data is organized and aligns with your product catalog. Each entry should include product identifiers and associated costs.
- Access Data Sources: Navigate to the Admin > Data Sources section in Adobe Analytics.
- Set Up a New Data Source: Create a new data source specifically for product costs. Define the purpose and structure of the data being imported.
- Map Cost Metrics to Dimensions: Map your cost metrics to product dimensions and other relevant variables. This ensures accurate attribution of costs to corresponding products.
- Upload Data: Use the Upload/FTP functionality provided during the data source setup to import your cost data into Adobe Analytics.
- Validate and Test: Verify the imported data to ensure accuracy. Use reporting tools to cross-check cost data against expected results.
Benefits of Importing Product Costs
- Improved ROI Analysis: Gain a clear understanding of profit margins by comparing revenue against product-specific costs.
- Enhanced Pricing Strategies: Identify opportunities to adjust pricing based on cost and performance insights.
- Accurate Campaign Assessment: Evaluate the cost-efficiency of marketing efforts, enabling better resource allocation.
These steps and Adobe Analytics’ capabilities enable you to enhance financial analysis and gain actionable insights that drive smarter business decisions.
To implement these advanced features, ensure your setup aligns with Adobe Analytics best practices. For additional insights into optimizing e-commerce campaigns, explore our detailed implementation guide.
By leveraging these advanced tools, you can elevate your e-commerce analytics strategy, ensuring that your campaigns are both impactful and data-driven.
Conclusion & Next Steps
Integrating Adobe Analytics into your digital campaigns is a critical component of ensuring data-driven marketing success. These practices align with the growing importance of data-driven decision-making and personalization in modern marketing, ensuring your strategies are well-positioned for success. By following Adobe Analytics best practices, you ensure your campaign tracking is not only precise but also aligned with your overarching business goals. This guide has highlighted strategies ranging from leveraging advanced features to optimizing e-commerce analytics, empowering you to create impactful and measurable campaigns.
To deepen your expertise, explore our resources on advanced analytics techniques and data management. Check out the comprehensive guide for digital analysts for a broader understanding, or dive into enhancing your campaign setups for actionable insights. For those looking to refine data integrity or explore innovative data layer applications, we recommend data layer best practices and GA4 data integrations.
Expand your analytics expertise with our upcoming Step-by-Step Guide to Adobe Analytics Implementation, which offers detailed advice and actionable tips tailored to professional needs. For additional resources, visit Adobe’s hub for Analytics and Launch documentation and explore how these tools can be tailored to your campaign needs.
Your journey to mastering Adobe Analytics starts here. Don’t forget to subscribe for updates and insights that keep you ahead in the ever-evolving digital landscape.