Master the Meta Conversions API with this practical guide. Learn server-side setup, event deduplication, and validation to improve ad performance.
The Meta Conversions API (CAPI) is a powerful tool that lets you send customer actions directly from your servers to Meta, completely bypassing the browser. This direct, server-to-server connection makes your ad tracking far more reliable than just using the Meta Pixel, because it isn't thrown off by ad blockers, cookie restrictions, or browser privacy settings.
Think of it this way: implementing CAPI is a strategic move to future-proof your analytics and make sure every dollar you spend on Meta ads is measured correctly.
Why the Meta Conversions API Is Now Essential
For years, the browser-based Meta Pixel was the go-to for tracking ad performance. It was a simple, solid solution back when third-party cookies were everywhere. But that world is disappearing, and fast.
Browsers like Safari and Firefox already block most tracking cookies, and Chrome is well on its way to phasing them out. Relying only on the Pixel today is like trying to navigate with a broken compass.
The entire digital advertising ecosystem is shifting under our feet. Ad blockers are now used by nearly 43% of global internet users, and privacy rules like GDPR and CCPA are giving people more say over how their data is used. This means a huge chunk of your customer journey is becoming invisible to browser-side tracking, leaving you with patchy data and skewed performance metrics.
The Business Case for Server-Side Tracking
This is where the Meta Conversions API stops being a "nice-to-have" and becomes a business necessity. It creates a direct line of communication from your server to Meta's platform, a fundamental change from the Pixel, which lives and dies by what the user's browser allows.
We break down the core concepts in our guide on what is server-side tracking, but the bottom line is this: because CAPI sends data from your server, it’s immune to the chaos happening in the browser. The result is a more complete, accurate, and trustworthy data stream that directly impacts your bottom line.
By sending a more reliable signal, you empower Meta's ad algorithms to find better audiences, optimize delivery more effectively, and attribute conversions with greater precision. It’s about restoring clarity to your ad spend in an increasingly opaque environment.
To give you a clearer picture, let's look at how the two methods stack up against each other.
Meta Pixel vs Conversions API: A Quick Comparison
The table below offers a high-level comparison, highlighting the fundamental differences in how data is collected, its reliability, and the overall capabilities of each tool.
While the Pixel is easier to get started with, CAPI provides the robust, resilient tracking that modern marketing demands. It's not about choosing one over the other; the best practice is to use them together for maximum coverage.
Lower Costs and Higher Confidence
The numbers don't lie. Campaigns that only use cookie-based tracking often see a 23% higher cost per acquisition compared to those that incorporate server-side data.
Even more telling, advertisers using the Conversions API report 16.4% higher attribution confidence than those sticking with just the Pixel. In a world where every marketing dollar needs justification, that's a metric you can't ignore.
Adopting CAPI means you can:
- Improve Attribution: Finally connect conversions to the right ads, even if the user's journey spans multiple devices or takes days to complete.
- Lower Acquisition Costs: Feed Meta’s algorithms better data, and they'll find your ideal customers more efficiently, cutting down on wasted spend and improving your CPA.
- Future-Proof Your Strategy: Build an analytics foundation that doesn't crumble when the next browser update rolls out. It’s about moving away from the fragile, outdated model of third-party cookies.
For a deeper dive into the entire implementation process, A Modern Marketer's Guide to the Meta Conversions API is an excellent resource that walks through everything in detail. At the end of the day, setting up CAPI is a strategic imperative for any business serious about getting a real return on its Meta advertising investment.
Your Implementation Blueprint for Mapping Events
A solid Meta Conversions API setup doesn't start with code or server tweaks. It begins with a strategic blueprint—a plan that connects what your business wants to achieve with the specific technical events you need to track. Honestly, this planning phase is the most important part of the whole process. Get it right, and the data you collect will be meaningful and genuinely useful.
If you just jump in without a clear map, you'll end up tracking vanity metrics or, worse, creating a noisy data stream that completely confuses Meta's optimization algorithms. The real goal here is to create a detailed spec sheet that becomes the single source of truth for both your marketing and development teams.
This process is also the secret to making sure the events fired from the browser (via the Pixel) and your server (via CAPI) are perfectly aligned. That alignment is what makes accurate reporting and effective event deduplication possible.
Defining Your Key Customer Journeys
Before you can track a single thing, you have to understand what user actions actually signal real intent. Instead of just rattling off a list of generic events, start by mapping out the critical paths people take on your site, from the moment they discover you to the moment they convert.
Think about the different stages of your funnel. For an e-commerce store, a typical journey might look something like this:
- Awareness: A user watches a video ad and clicks through to a product category page.
- Consideration: They check out a few different product pages, maybe use a search filter, and eventually add an item to their cart.
- Conversion: They start the checkout process, enter their payment info, and complete the purchase.
Each of these steps is packed with high-value interactions that you should capture as distinct events. This approach makes sure your tracking plan is tied directly to business results, not just a list of technical actions.
The diagram below gives you a simplified look at this data flow, showing how user actions are sent from your website, through your server, and on to Meta.
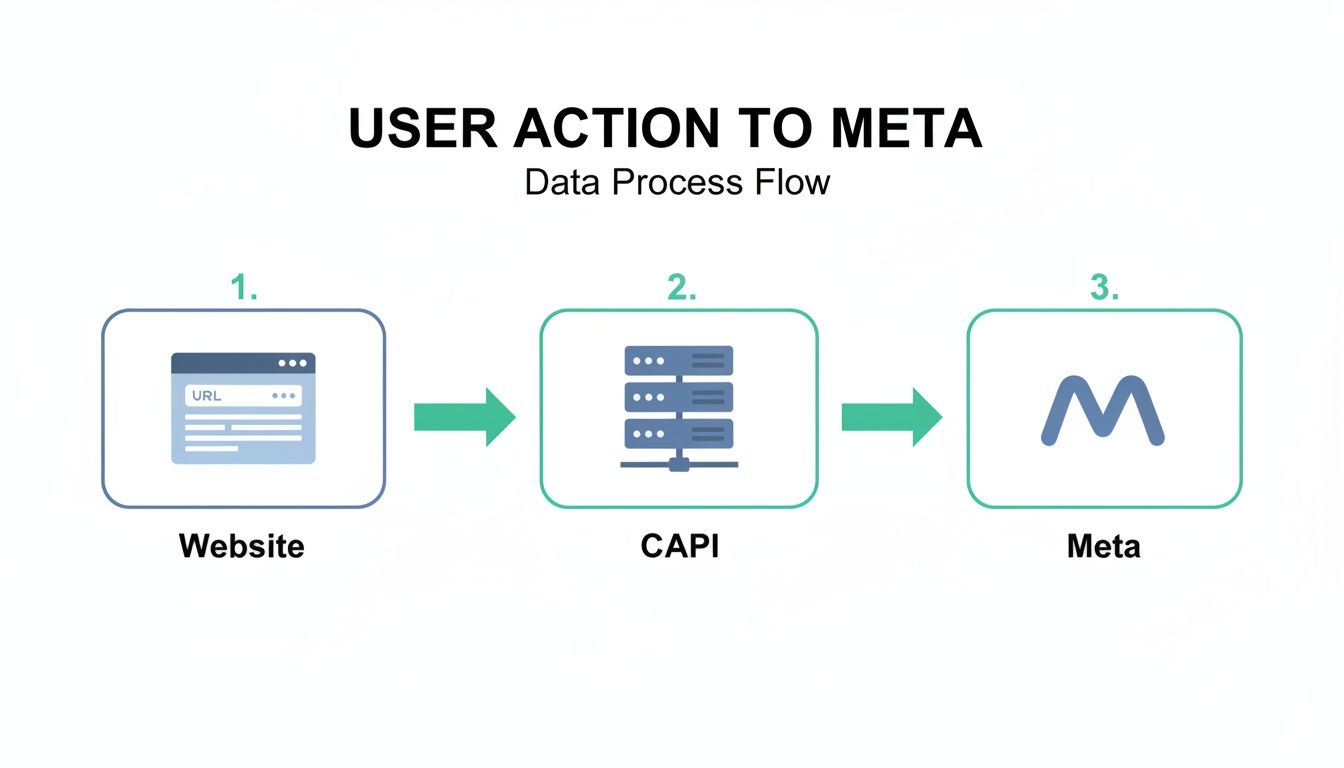
As you can see, it's a dual-pathway approach. The server-side CAPI acts as a much more reliable channel that sidesteps the ad blockers and browser restrictions that can interfere with the Pixel.
Selecting Standard and Custom Events
Once you have your customer journeys mapped out, it's time to pick the right events to track. Meta provides a whole list of standard events that cover most common user actions and are already optimized for their ad system.
My advice? Stick with standard events whenever you can. For instance:
- Use
ViewContentfor product page views. - Use
AddToCartwhen someone adds an item to their cart. - Use
Purchasefor a completed transaction.
But sometimes your business has unique conversion moments that don't neatly fit into a standard category. That's what custom events are for. If you're a SaaS company, you might create a custom event like DemoRequested or TrialStarted. The most important thing is to choose names that are clear and, above all, consistent.
Your event naming convention is crucial. An event named
add_to_carton the browser andAddedToCarton the server will be treated as two separate actions by Meta, breaking your deduplication and skewing your data. Consistency is non-negotiable.
Building Your Data Layer Specification
With your events defined, the final planning step is to build a detailed data layer specification. This document should outline every single event, the parameters it needs to include, and the exact data format for each of those parameters.
This spec needs to detail the crucial customer information parameters that boost your Event Match Quality—things like hashed email addresses (em), phone numbers (ph), and full names (fn, ln). And remember, all personally identifiable information (PII) must be SHA-256 hashed before you send it to the Meta Conversions API.
A well-documented data layer plan is the definitive guide for your developers. It ensures they implement tracking that perfectly matches what marketing needs, preventing costly mistakes and guaranteeing the data flowing into Meta is clean, consistent, and ready for optimization from day one.
Choosing Your Server-Side Integration Path
Alright, you’ve got your event blueprint ready to go. Now comes the technical part: deciding how you're going to send that data to the Meta Conversions API. This is a critical decision that really depends on your team's tech skills, the tools you're already using, and your budget.
There’s no one-size-fits-all answer here. The "best" method is simply the one that makes sense for your business and won't become a maintenance nightmare down the road. Let's walk through the most common paths so you can choose a secure and scalable approach from the start.
A good grasp of the basics, like the differences between an Application Server vs Web Server, can also help you make a more informed architectural decision.
Partner Integrations
For a lot of teams, especially in e-commerce, a partner integration is the path of least resistance. These are turn-key solutions from platforms you're probably already using, like Shopify, Segment, or Adobe, and they do most of the heavy lifting for you.
- Pros: They are often incredibly easy to set up—sometimes it's just a matter of a few clicks. This route drastically cuts down on development time and saves you from managing your own server infrastructure.
- Cons: The convenience comes at the cost of flexibility. You’re boxed in by the features the partner provides, which might not cover all your unique tracking needs.
- Best For: E-commerce stores running on platforms like Shopify or BigCommerce, or any company already deep into a Customer Data Platform (CDP) like Segment.
Server-Side Google Tag Manager (sGTM)
Using a server-side GTM container has become a very popular middle ground. It gives you far more control than a direct partner integration, but you don't have to build and maintain everything from the ground up. You essentially set up a tagging server on a cloud platform, which acts as a proxy to receive data from your site before forwarding it to Meta.
This approach strikes a great balance between control and convenience. For a full walkthrough, check out our guide on setting up the Meta CAPI with sGTM.
Think of server-side GTM as a powerful data router. It lets you manage tags for Meta, Google Ads, and other platforms all from a single, secure server environment, which is a huge win for centralizing data governance.
Custom Builds with Cloud Functions
If you have engineering resources to spare, a completely custom build offers the ultimate level of control. This path involves writing your own code to send events directly to the CAPI endpoint, typically using serverless tech like AWS Lambda or Google Cloud Functions.
- Pros: You get total command over every aspect—data transformation, error handling, security, you name it. It can also be surprisingly cost-effective at a large scale since you only pay for the compute time you actually use.
- Cons: This is by far the most technically demanding option. It requires a significant upfront investment from developers for the initial build, plus ongoing maintenance and troubleshooting.
- Best For: Larger organizations with in-house engineering teams and highly specific data processing rules that off-the-shelf solutions just can't handle.
Here’s a quick breakdown of how these three paths compare:
Generating and Managing Access Tokens
No matter which path you take, you'll need an access token to authenticate your requests to the Meta Conversions API. This token is basically the secure key to your data pipeline.
You can generate this token right from your Meta Events Manager. Just head to your dataset's settings, find the Conversions API section, and click "Generate access token."
Once you have it, treat this token like a password. It needs to be stored securely, either as an environment variable on your server or within a dedicated secret manager. Under no circumstances should you ever expose it in client-side code or commit it to a public GitHub repository. If you even suspect a token has been compromised, revoke it immediately and generate a new one to protect your data.
Nailing Event Deduplication and Data Privacy

Running the Meta Pixel and the Conversions API in tandem is the gold standard for data collection, but it comes with a major catch: duplicate events. If you're not careful, Meta will receive two signals for the same user action—one from the browser, one from your server—and happily double-count your conversions. This inflates your performance metrics, throws Meta's ad delivery algorithms off course, and leads you to optimize campaigns based on bad data.
The fix is a process called event deduplication. Think of it as telling Meta, "Hey, you're about to see two event signals, but they're for the exact same customer action. Please treat them as one." Getting this right isn't just a technicality; it's absolutely fundamental to maintaining data integrity.
How Event Deduplication Works
The entire process boils down to one crucial parameter: the event_id.
Here’s the game plan: you need to generate a unique identifier the moment a user triggers a conversion event. This exact same event_id has to be included in both the Pixel event payload sent from the browser and the corresponding Conversions API event payload sent from your server.
When Meta’s servers see two events arrive with a matching event_id, they automatically flag them as duplicates. The system gives priority to the server-side event from CAPI since it's considered more reliable, and simply discards the browser-side event. It works both ways—if the server event gets there first, the browser event is ignored, and vice-versa. No more double-counting.
Key Takeaway: The
event_idhas to be completely unique for each individual user action. You can't reuse an ID for different conversions. A common and effective way to generate one is by using a UUID (Universally Unique Identifier) or even just a combination of a timestamp and user ID.
Handling Personally Identifiable Information Securely
Beyond just accuracy, data privacy is completely non-negotiable. A key benefit of the Meta Conversions API is its ability to improve Event Match Quality by sending customer details like email addresses, phone numbers, and names. But sending this data in plain text is a massive privacy breach.
Before any Personally Identifiable Information (PII) ever leaves your server, it must be hashed using the SHA-256 algorithm. Hashing is a one-way cryptographic function that turns sensitive data into a unique, irreversible string of characters. This lets Meta match the event to a user account on their end without ever seeing the raw PII.
Your data privacy checklist should look something like this:
- SHA-256 Hashing: Make sure all PII parameters (
em,ph,fn,ln, etc.) are properly hashed on your server before you hit send. - Data Minimization: Only collect and send the customer information that's absolutely necessary for matching and for which you have explicit user consent.
- Consent Alignment: Your server-side logic has to respect the choices users make in your Consent Management Platform (CMP). If a user opts out of tracking, your server shouldn't send any events to the Conversions API for them. Period.
Aligning CAPI with Privacy Regulations
The move toward first-party data strategies, powered by tools like the Conversions API, isn't just a trend—it's the new reality. Recent data reveals that first-party data usage in Facebook ad campaigns has jumped by 47%, largely thanks to tools that integrate CRM data and advanced conversion tracking.
This reflects a much broader industry pivot away from unreliable third-party cookies toward building direct data relationships. Even Meta's own AI-powered privacy models have helped cut data loss by 22% in targeted campaigns, showing that robust privacy and accurate data can absolutely go hand-in-hand. You can explore more statistics about this industry shift to see the bigger picture.
To ensure your CAPI setup is compliant with regulations like GDPR and CCPA, you need to build a system that honors user consent. This means your server-side logic must be wired directly into your consent management solution. When a user provides or revokes consent, that signal should immediately dictate whether your server generates and sends an event to Meta, creating a privacy-first architecture from the ground up.
How to Validate and Monitor Your CAPI Setup
Getting your Meta Conversions API implementation live is a huge milestone, but the job isn't finished. An unverified setup is just a black box—you're basically sending data into the void and just hoping it's accurate and complete.
Your implementation is only as good as the data it produces. This makes validation and ongoing monitoring absolutely essential. Think of it like launching a new car. You wouldn’t just assemble it and ship it out; you'd put it through rigorous testing. The same logic applies here. This final phase is about building long-term trust in the data that fuels your ad spend.
Initial Checks with Meta's Test Events Tool
Your first stop for validation should always be Meta's own Test Events tool, which you can find right inside the Events Manager. This tool gives you a real-time feed of the events arriving from both your Pixel and your server, making it the perfect place to confirm your initial setup is working correctly.
To get started, you just need to grab a test code from the tool and pop it into your server-side event payloads. As you click around your site and trigger key actions, you can watch them appear live in the Test Events interface. This is your chance to verify critical details, especially event deduplication. What you want to see is both the browser and server events arriving with the same event_id, with one being processed and the other correctly deduplicated.

This manual check is an indispensable first step. It helps you catch the most obvious configuration errors before they can mess with your live data. But it's just a snapshot in time and can't protect you from problems that pop up down the road.
Moving Beyond Manual Checks with Automated Monitoring
Manual testing is great for a one-time check, but your digital environment is always in flux. A website update, a tweak to a third-party tool, or even a tiny coding mistake can break your CAPI integration without you ever knowing it. Relying on occasional spot-checks is a recipe for data decay.
This is where continuous, automated monitoring becomes a game-changer. A platform like Trackingplan acts as a permanent watchdog for your entire analytics implementation, giving you real-time alerts the moment something goes wrong. This proactive approach is what separates a fragile setup from a truly resilient one.
A "set it and forget it" mentality is the fastest way to waste ad spend. Your CAPI implementation requires ongoing governance to ensure the data remains accurate and trustworthy long after the initial launch.
Automated monitoring shifts you from a reactive, "fix it when it's broken" model to a proactive one. You can identify and resolve issues before they ever get a chance to corrupt your campaign data.
Common CAPI Implementation Issues and Solutions
When you're keeping an eye on a Meta Conversions API setup, certain problems tend to surface more than others. Automated tools are especially good at spotting these issues at scale before they become major headaches.
Here’s a quick troubleshooting guide for some common symptoms you might run into.
Common CAPI Implementation Issues and Solutions
By building a robust validation and monitoring workflow, you protect your ad investment and ensure the data driving your decisions is always reliable. This final step transforms your CAPI setup from a completed project into a continuously optimized, trustworthy asset for your marketing team.
Your Meta Conversions API Questions Answered
Even with a solid plan, jumping into the Meta Conversions API can feel like opening a can of worms. Let's tackle some of the most common questions we hear from teams on the ground to clear up any confusion about your CAPI implementation and strategy.
Do I Still Need the Meta Pixel if I Use CAPI?
Yes, absolutely. Think of the Pixel and CAPI as a team—they're designed to work together, and Meta's official recommendation is to use both. You'll get the best results by running them in parallel.
The Pixel is still your go-to for capturing rich, browser-level data. It's fantastic for building website custom audiences for retargeting, optimizing ad delivery for top-of-funnel actions like landing page views, and powering your dynamic product ads.
The Conversions API, on the other hand, is your reliable, server-side backbone. It picks up the slack, capturing conversions the Pixel might miss due to ad blockers, ITP, or network hiccups. By sending events from both sources with a unique event_id for deduplication, you create a much more resilient and complete data picture. This synergy gives Meta the full story, leading to better optimization and more accurate attribution.
How Does the Conversions API Affect Event Match Quality?
It can be a game-changer for your Event Match Quality score. This score is basically Meta’s confidence level in matching the conversion events you send to actual user accounts on their platform. A higher score means better attribution and, often, a lower cost per result.
The Pixel is limited by the shaky reliability of browser cookies. CAPI blows past that limitation by letting you send more stable, high-quality customer identifiers directly from your server—things like hashed email addresses, phone numbers, and names you've collected with user consent.
The more of these robust, hashed identifiers you can provide, the more data points Meta has to work with to find a match. This directly boosts your match quality score, which translates into more accurate attribution, better audience creation, and a lower cost per action for your campaigns.
What Are the Most Common CAPI Setup Mistakes?
From what we've seen, a few common slip-ups are responsible for most of the headaches during a CAPI setup. Getting these right from the start is critical for data integrity.
- Broken Event Deduplication: This is the big one. Failing to generate and send the exact same unique
event_idfor a single user action from both the Pixel and CAPI is a recipe for disaster. It leads to double-counting conversions and completely throws off your performance data. - Improper PII Hashing: Sending personally identifiable information (PII) in plain text is a major technical and privacy no-go. All PII must be SHA-256 hashed before it even thinks about leaving your server.
- Inconsistent Naming and Parameters: One of the easiest mistakes to make is using different event names or parameter casing for the same action. For example, sending
AddToCartfrom the Pixel andadd_to_cartfrom CAPI will confuse Meta’s algorithms and break the deduplication process. - "Set It and Forget It" Mentality: Many teams set up CAPI and just assume it'll run perfectly forever. But website updates, backend changes, or even a simple plugin update can break your implementation. You need continuous monitoring to catch errors before they start burning through your ad budget.
How Can I Track Offline Conversions with CAPI?
This is one of CAPI’s most powerful yet underutilized features. Because it operates from your server, you can tell Meta about important customer actions that never even happen in a browser.
To track offline conversions—like a purchase in a physical store, a signed contract, or a subscription activated over the phone—you just need a way to link that person back to their online profile. Usually, this means collecting an email address or phone number at the point of sale.
Once you have that, you can compile these conversion events, hash the PII, and send them to the Conversions API through a direct integration or even an offline event upload. This finally gives Meta a view of the full customer journey, allowing it to optimize for high-value actions that happen entirely offline.
Ready to stop worrying about broken tracking and data gaps? Trackingplan offers a fully automated analytics QA platform that discovers and monitors your entire analytics setup, including your Meta Conversions API implementation. Get real-time alerts on missing events, schema errors, and potential PII leaks before they impact your ROI.
Ensure your Meta CAPI data is always accurate with Trackingplan.