Master tag management adobe with a practical, step-by-step guide to setup, governance, and insights for reliable marketing data.
At its core, tag management in the Adobe ecosystem is all about deploying and managing the countless marketing and analytics code snippets (we call them "tags") on your website from one central control panel. The current powerhouse for this is Adobe Experience Platform Tags, a system designed to wrangle how data gets collected and where it’s sent across all your digital marketing tools. This centralized setup is a lifesaver for preventing code conflicts and making data collection a whole lot cleaner.
Why Adobe Tag Management Is Your Data's Foundation

Imagine your website is a brand-new, bustling city. Every marketing tool you use—analytics platforms, ad pixels, personalization engines—is a building that needs to be constructed. If you add tracking code manually, it’s like digging a new foundation and running separate utility lines for every single building. You end up with a chaotic, fragile, and slow underground network that’s a nightmare to manage. It's messy, and you’re constantly calling in developers for every little change.
A tag management system, on the other hand, acts as the city’s master utility grid. Instead of each building getting its own messy connection, they all plug into one central hub. This hub efficiently manages the flow of data, making sure every building gets exactly what it needs without ever interfering with the others.
The Evolution from DTM to Adobe Tags
Adobe’s journey here started with Dynamic Tag Management (DTM). For its time, it was a game-changer, giving marketers the freedom to manage tags without leaning on developers for every request. But as the digital world got more complicated, it was clear a more modern solution was needed. That’s what led to Adobe Experience Platform Tags, which many of us still know by its original project name, Launch.
This new platform was a complete rebuild, designed from the ground up to be faster, more flexible, and way more extensible. With its open architecture and a rich marketplace of extensions, plugging in new tools is now a simple, almost effortless process.
A solid tag management strategy is the bedrock of any successful digital analytics program. It is the non-negotiable first step toward achieving reliable data, enabling meaningful personalization, and accurately proving marketing ROI.
Core Benefits of a Centralized System
Switching to a centralized system like Adobe Tags isn't just a technical convenience; it's a strategic move that directly impacts your bottom line and how efficiently your teams can operate.
Here’s where you’ll see the real wins:
- Improved Agility: Marketers can roll out new tracking pixels or tweak existing ones in minutes, not weeks. This drastically cuts down the dependency on packed developer schedules.
- Enhanced Site Performance: By loading scripts asynchronously and consolidating all that code, Adobe Tags helps speed up your page load times—a huge factor for both user experience and SEO.
- Reliable Data Governance: You get a single point of control over what data is collected and where it goes. This is absolutely critical for ensuring data accuracy and staying compliant with privacy regulations.
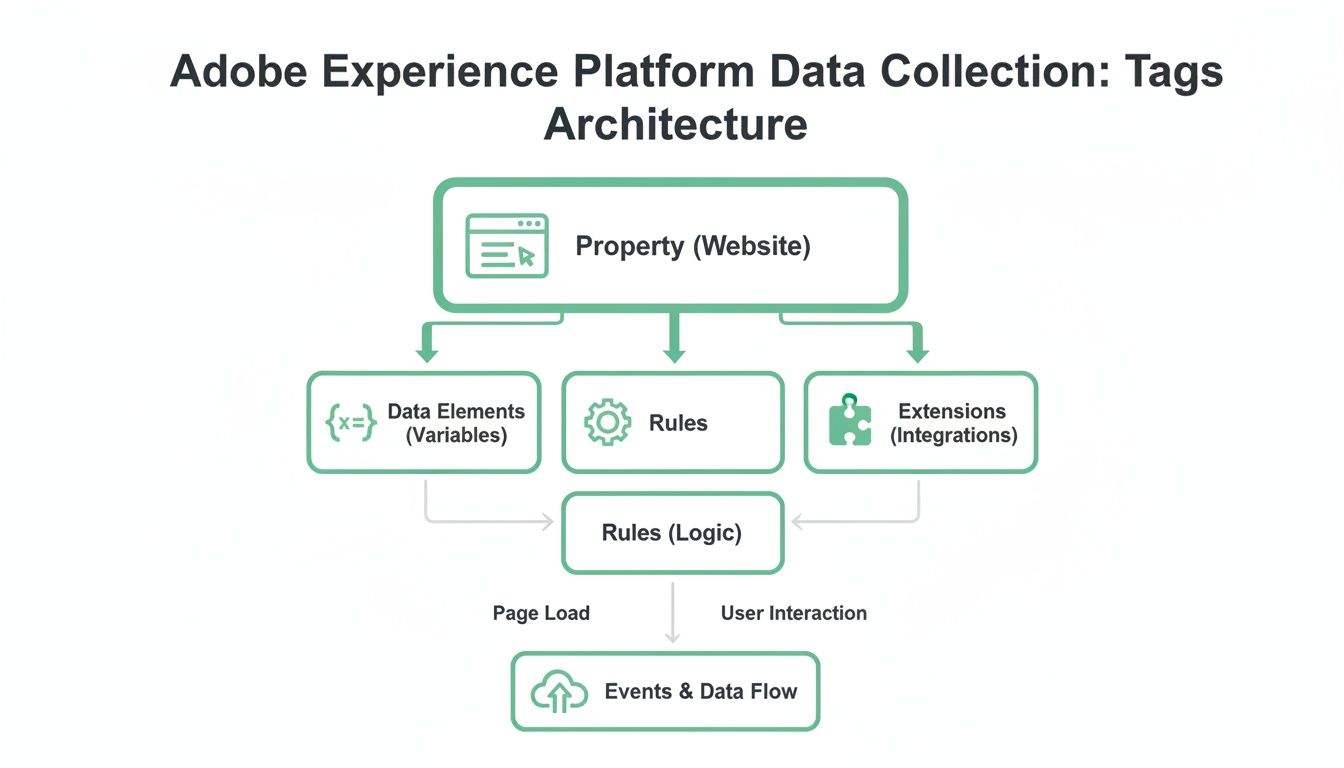
Deconstructing The Core Architecture Of Adobe Tags
To really get the most out of Adobe Tags, you first need to understand its core building blocks. Think of it like a recipe—each ingredient has a specific role, and getting the mix right is what gives you a perfect result. In our case, that result is clean, reliable data.
The whole system is built on four fundamental components that work together: Properties, Data Elements, Rules, and Extensions. Once you grasp how they interact, you'll be able to move beyond basic setups and start building sophisticated data collection strategies. A solid handle on this architecture means you won't just know what to do, but why you're doing it.
The Four Pillars of Adobe Tag Management
Let's use an analogy. Imagine you're building a smart home system for your website.
In this scenario, the Property is the house itself. It's a container that holds all the wiring and instructions for a specific website or a group of related sites. Everything you configure for that site lives inside this single property.
Next up, you need sensors to gather information. These are your Data Elements. Think of them as variables that capture specific pieces of information, like the temperature in a room ('Page Name'), who just walked in ('User ID'), or whether a window is open or closed ('Product SKU'). They dynamically pull information from your data layer, cookies, or right off the page itself.
Then you need the logic. Rules are the "if this, then that" commands for your smart home. For example, if a user clicks the "Add to Cart" button (the event), then send a signal to your analytics tool (the action). Rules are constantly listening for specific user interactions or page events and decide what to do when they happen.
Finally, Extensions are the pre-built appliances and integrations you plug into your smart home system. An extension for Adobe Analytics connects your rules to that platform, while another for the Facebook pixel connects it to your social media campaigns. They are essentially plug-ins that make it much easier to send data to all your different third-party tools.
To help clarify these concepts, here's a quick breakdown of how each component functions within the Adobe Tags ecosystem.
Core Components of Adobe Tags Explained
A summary of the primary building blocks within Adobe Experience Platform Tags and their functions.
This table simplifies the architecture, showing how each piece has a distinct but interconnected role in making your tag management system work.
The real power of Adobe's tag management lies in how these four components—Properties, Data Elements, Rules, and Extensions—work in concert. A Rule is triggered by an event, uses Data Elements to gather context, and leverages an Extension to send that information to its final destination.
This modular structure is exactly why modern tag management has become so essential. The global tag management system market, valued at USD 1.24 billion, is projected to rocket to USD 6.45 billion by 2033. This growth makes it clear just how critical a well-organized data infrastructure is for any business that wants to make data-driven decisions.
As your tracking needs grow more complex, you can't afford to be disorganized. Having a systematic approach to managing tags is no longer optional. This is especially true when you're moving from an older system. For a deeper dive on that, check out our guide on migrating from Adobe's legacy system in our Dynamic Tag Management Adobe Analytics guide. This knowledge will help you build a more robust and scalable implementation right from the start.
Your First Steps In Setting Up Adobe Tags
Getting started with Adobe's tag management system can feel a bit like assembling complex furniture—intimidating at first, but surprisingly logical once you get the hang of the instructions. Let's walk through the essential first steps, from setting up your digital workspace to deploying your very first tag. We'll turn what seems complex into a series of manageable steps.
The journey begins by creating a property. Think of a property as a dedicated container for a single website or a small group of related sites. It’s the home for all your rules, data elements, and extensions for that specific digital space. Nailing this foundational step is key to keeping your entire implementation organized.
This visual shows how a property serves as the top-level container, holding all the core components you'll be working with.
As you can see, everything you build—from capturing user data to firing off tracking pixels—is neatly organized inside your designated property.
Installing The JavaScript Library
Once your property is set up, you need to connect it to your website. Adobe Tags generates a small JavaScript snippet, often called the embed code. You'll need to place this code inside the <head> section of your site's HTML.
This one line of code is the critical bridge connecting your website to the Adobe Experience Cloud. It loads your tag library asynchronously, which is a fancy way of saying it won’t slow down your page rendering. Getting this part right is non-negotiable; without it, none of your carefully crafted tags will ever see the light of day.
Configuring Your First Rule
With the library installed, it's time for the fun part: creating your first rule. A rule is the real engine of Adobe Tags, and it’s built on three core parts: Events, Conditions, and Actions.
- Event: This is your trigger. A great starting point is the "Library Loaded (Page Top)" event, which fires the moment the Adobe Tags library loads on a page.
- Condition: This is an optional but powerful filter. For instance, you could set a condition so the rule only runs on specific pages, like your homepage.
- Action: This is what you want to happen when the event and conditions are met. A common action is telling an extension (like Adobe Analytics) to send a page view beacon.
This simple "if-then" logic is the heart of all tracking. Think of it like this: IF the page loads, and IF the URL is the homepage, THEN send a page view event to Adobe Analytics.
The publishing workflow is your safety net. It allows you to build, test, and approve every change in isolated environments, preventing broken tracking from ever reaching your live audience.
Mastering The Publishing Workflow
Making changes directly to a live website is a recipe for disaster. That’s why Adobe Tags uses a structured publishing workflow with different environments. Think of them as separate sandboxes where you can build and test your work safely.
A standard setup includes three key environments:
- Development: This is your personal workshop. Here, you create a "library" of changes and deploy it to a development server that only you and your team can access. Feel free to experiment without any risk.
- Staging: Once your changes look good in development, you submit the library for approval. When approved, it gets published to the staging environment. This is where your QA team can perform formal testing on a perfect mirror of your live site.
- Production: After the library passes every test in staging, it receives final approval and is published to production. Only at this point do your changes go live for all your website visitors.
This disciplined process ensures every change is thoroughly vetted before it goes out. It transforms tag management from a chaotic free-for-all into a predictable, reliable system. By following these initial steps, you'll build a solid foundation for all your future tracking and analysis.
Implementing Common And Advanced Tracking Scenarios
Once you've got the basics down, the real power of Adobe's tag management system starts to shine when you tackle specific, real-world tracking problems. Today’s websites aren't just static pages; they're dynamic, interactive experiences. To truly measure what users are doing, you have to move beyond simple page views and start capturing the interactions that really matter.
This is where event-based tracking comes in. We're talking about tracking form submissions, video plays, and clicks on those all-important call-to-action buttons. On top of that, you'll likely need to deploy third-party marketing pixels from platforms like Google Ads or LinkedIn to see how your campaigns are performing. Each of these situations needs a slightly different touch within Adobe Tags.
Tracking In Single-Page Applications
Single-Page Applications (SPAs), those slick sites built with frameworks like React or Angular, throw a wrench in traditional tracking. In an SPA, a user can navigate through multiple "screens" without the browser ever doing a full page reload. This means the standard "page view" trigger you set up earlier won't fire after the initial load, leaving you blind to a huge chunk of user activity.
To get around this, Adobe Tags listens for events that are unique to SPAs.
- Hash Change Events: These keep an eye on changes in the URL after the
#symbol, a common routing method in many SPAs. - Push State Events: More modern SPAs use the History API (
pushState) to change the URL silently. Adobe Tags can listen for these events, too.
By building rules that trigger on these SPA-specific events, you can fire a "virtual page view" every time a user moves to a new screen. This ensures your analytics tools get the updated data they need to accurately map the user's journey.
Capturing Key User Interactions
Beyond just knowing where users are navigating, you need to understand what they're doing on each page. This is the heart of event-based tracking. Let's say your main goal is to see how many people watch your new promo video or fill out a lead form.
You'd set up specific rules for each of these key interactions:
- Video Views: A rule could listen for a "click" event on the video's play button. When someone clicks it, the rule fires and sends an event to Adobe Analytics, maybe passing along data elements like the video's title and where it sits on the page.
- Form Submissions: In the same way, you can create a rule that triggers on the "submit" event of your contact form. This would fire off a "form submission" event, giving you a clear signal of a successful lead.
This kind of granular tracking gives you much richer insight than page views alone. You're no longer just guessing; you know exactly which features your users are engaging with.
The gold standard for stable and scalable data collection is the Adobe Client Data Layer (ACDL). It acts as a universal translator between your website and your tag management system, ensuring your tracking remains intact even when your website's design changes.
Leveraging The Adobe Client Data Layer
The most bulletproof way to manage data collection is to implement a data layer. The Adobe Client Data Layer (ACDL) is a standardized, event-driven data store you can add to your site. Think of it as a structured object that holds all the information you want to track—things like page.pageInfo.pageName or user.profile.isLoggedIn.
Instead of making Adobe Tags scrape the page for information, your developers push data directly to the ACDL. Your data elements inside Adobe Tags then just have to reference the data layer. This separation is incredibly powerful. If a developer completely overhauls the HTML structure of a product page, your tracking won't break because the data layer object stays the same. It makes your whole analytics setup more resilient and way easier to manage over the long run.
Building A Resilient And Integrated Martech Stack
A tag management system isn't just a deployment tool—it's the central nervous system connecting your entire marketing technology stack. Its real power shines when it makes different platforms talk to each other, creating a single, reliable stream of data. Without that, you're just left with siloed information and a disjointed picture of your customer's journey.
For any tag management adobe setup, the most vital connection is with Adobe Analytics. This is where raw data gets turned into real business insights. The process boils down to meticulously mapping the Data Elements you’ve set up in Adobe Tags to specific variables in Adobe Analytics, like eVars and props.
Connecting Adobe Tags To Adobe Analytics
Think of your Data Elements as packages of information, each with a specific label. Your Adobe Analytics variables are the mail slots where those packages need to go. For instance, a Data Element that grabs the page name has to be mapped directly to a specific prop, say prop1, in Analytics. In the same way, you might use an eVar like eVar5 to track a user’s logged-in status throughout their entire visit.
Getting this mapping right is absolutely critical. A simple mistake—like sending a product SKU to a variable that’s expecting a campaign code—can completely corrupt your reports. That leads to bad analysis and even worse business decisions. The goal is a clean, direct pipeline from your website data to your analytics reports.
The Critical Role Of Analytics Observability
Once that data starts flowing, how do you know it's actually accurate? Manual spot-checks and quarterly audits are slow, tedious, and almost always miss temporary glitches. This is where analytics observability platforms like Trackingplan become indispensable. They act as a fully automated quality assurance layer for your entire implementation.
Instead of just checking if tags are deployed, an observability tool watches the data that’s actually being collected. It’s like having a security guard on duty 24/7, inspecting every single piece of information that flows through your system.
An analytics observability platform automates the whole QA process. It constantly scans for broken tags, data schema mismatches, and rogue events in real-time. This is how you build unshakable trust in your analytics and make confident, data-driven decisions.
This kind of automated monitoring guarantees that the data feeding your dashboards is consistently accurate and reliable. You can finally trust that the insights you're acting on reflect what users are truly doing, not just a mess of corrupted or incomplete data.
Ensuring Data Integrity Across Your Stack
The need for this QA layer gets magnified when you consider just how many businesses rely on Adobe. Its tag management technology powers over 133,000 live websites around the world, which means the potential for data errors is massive. With such widespread use, automated monitoring is no longer a "nice-to-have"—it's a must-have for maintaining data integrity.
An observability platform gives you real-time alerts on common, yet critical, issues:
- Broken Tags: Get notified the second a tag stops firing correctly after a new site deployment.
- Schema Mismatches: Catch when the data being sent doesn’t fit the expected format, like a text string showing up where a number should be.
- Rogue Events: Pinpoint unexpected tracking events that could be polluting your data sets.
By catching these problems the moment they happen, you stop bad data from ever making it into your analytics platform. This proactive stance is just as important for more advanced implementations. For anyone exploring different deployment models, our guide on server-side tagging with Adobe Launch offers more context on keeping data clean in complex setups. That kind of resilience is what separates a fragile martech stack from a truly mature and trustworthy one.
Establishing Governance And Long-Term Best Practices

Getting Adobe Tags up and running is a huge first step, but the real challenge is keeping the system clean and scalable down the road. Without strong governance, even the most carefully planned implementation can spiral into "tag chaos." This is where a clear framework for long-term management becomes absolutely critical, turning your initial setup from a one-off project into a lasting asset.
Think of your tag management system like a brand-new public library. On opening day, every book is perfectly cataloged and in its proper place. But what happens without a librarian to enforce the rules? No checkout process, no standardized shelving system, no restricted access to the archives. It would quickly become a disorganized mess where nothing can be found. Governance provides those essential rules for your data.
Creating A Standardized Naming Convention
The first rule of any clean library is a consistent cataloging system. The same is true for tag management adobe implementations. Your first line of defense against confusion is a standardized naming convention for every single data element, rule, and extension you create.
This simple practice ensures anyone on your team can understand what an element does just by glancing at its name.
A simple yet effective convention might look something like this:
- Rules:
[Category] - [Trigger] - [Action](e.g.,Analytics - Page Load - Send Page View) - Data Elements:
[Type] - [Description](e.g.,DL - Page NameorCookie - User ID) - Extensions:
[Vendor] - [Configuration Purpose](e.g.,Adobe Analytics - Production Report Suite)
This structure completely removes the guesswork and makes troubleshooting worlds easier. When a problem pops up, a clearly named rule instantly tells you what it's supposed to do and where you should start looking for errors.
The most critical component of long-term success is maintaining a single source of truth for your tracking plan. This living document outlines what should be tracked, why it's tracked, and how it's implemented.
Managing User Permissions And Documentation
Let's be honest: not everyone needs the keys to publish changes to your live website. Just like a library has different access levels for patrons and staff, your Adobe Tags property should, too. Establishing clear user permissions is a non-negotiable governance practice.
Limit publishing rights to a small, well-trained group of administrators. This is the best way to prevent accidental deployments of broken tracking from well-intentioned but untrained team members.
Alongside permissions, comprehensive documentation is a must. Your tracking plan should be the definitive guide to your implementation, detailing every rule and data element. This document is a foundational piece of your strategy, and you can learn more about building one in these data governance best practices.
To really bulletproof your setup, you can also explore how software test automation for faster, safer releases can provide a safety net against human error. By combining strict permissions, detailed documentation, and automated testing, you create a resilient system that can adapt to business needs without sacrificing data quality. This disciplined approach ensures your analytics remain trustworthy for years to come.
Frequently Asked Questions About Adobe Tag Management
Even after you get the hang of the basics, a powerful system like Adobe Experience Platform Tags always brings up a few more questions. Let's tackle some of the most common ones to clear up any lingering confusion and help you feel more confident in your setup.
What's The Real Difference Between DTM And Adobe Experience Platform Tags?
Think of Adobe Experience Platform Tags (or Launch, as most of us still call it) as the modern successor to the old Dynamic Tag Management (DTM). The biggest change is under the hood: Launch was built from the ground up on an API-first framework, which makes it incredibly flexible and powerful.
Here are the key upgrades:
- Extensions: Launch brought in an "app store" model. This means you get seamless, pre-built integrations for third-party tools instead of wrestling with custom code for everything.
- Performance: It's way faster. Launch uses asynchronous loading, so it won’t bog down your site’s performance like older tag managers sometimes could.
- Rule Builder: The interface for building rules is just plain better—more intuitive, more powerful, and makes handling complex logic much simpler.
Bottom line: DTM was great for its time, but Launch is a complete evolution. DTM is officially end-of-life, so if you haven't migrated yet, now's the time.
Can I Use Adobe Experience Platform Tags For Non-Adobe Tools?
Absolutely. While it’s built to work perfectly with the Adobe Experience Cloud, the platform is completely vendor-agnostic. It’s designed to be the central command center for your entire marketing tech stack, not just Adobe’s own products.
With a huge marketplace of Extensions and the flexibility to add custom code, you can deploy and manage tags for just about any third-party tool out there. This includes things like Google Analytics, social media pixels from Facebook or LinkedIn, and all sorts of other advertising and analytics scripts.
How Does An Observability Platform Help With Adobe Tag Management?
An observability platform like Trackingplan is like having an automated QA team working 24/7 on your analytics. While Adobe Tags is responsible for deploying your tracking, an observability platform checks to see what data is actually being collected—in real time.
An observability platform validates your data right at the source. It automatically flags issues like broken tags, weird data formats, or unexpected events. This stops bad data from ever making it into your analytics reports, so you can trust what you see without having to do endless manual checks.
This kind of proactive monitoring gives you confidence in your data and frees your team from the soul-crushing work of manual validation.
Why Is A Data Layer So Important For Adobe Tags?
A data layer is basically a structured JavaScript object on your site that holds all the important information you want to track. It's the stable, reliable middleman between your website's code and your tag management system.
By using a data layer, you separate your analytics from your website's visual design. Your developers can push key details like product_name or user_status into this layer. Then, your Data Elements in Adobe Tags can just grab that info directly. This makes your whole setup far more robust, because a website redesign or minor code change won't suddenly break all your tracking.
Ensure every tag and event performs as expected with automated QA. Trackingplan provides complete visibility into your analytics implementation, helping you detect and fix data issues before they impact your business decisions. Learn more about how Trackingplan can protect your data integrity.