
Explore our complete guide to the Adobe Launch extension. Learn how to simplify tag management, streamline analytics, and ensure flawless data quality.
An Adobe Launch extension is a bundle of code that adds new features and integrations to your website through Adobe's tag management system. Think of them like apps for your website's data layer. They let you quickly connect third-party tools like analytics platforms, ad pixels, or A/B testing solutions without getting deep into manual coding, which speeds up your marketing and analytics work.
What Is an Adobe Launch Extension and Why You Need It
Imagine wanting a new feature on your smartphone. Instead of just downloading an app, you had to rewrite parts of the phone's operating system yourself. It would be complicated, risky, and incredibly slow. That’s what managing website tags felt like before modern tag management came along.
An Adobe Experience Platform Launch extension is the "app store" solution to that problem. It gives you a simple interface to deploy and manage powerful marketing tools—like Google Analytics, the Facebook Pixel, or A/B testing platforms—right on your site. The best part? You can do all of this without ever touching your site's source code, which frees you from relying on developer queues.
The Evolution from DTM to Extensions
This system is a huge leap forward from older methods. Before extensions, many of us were working in Adobe's older tag manager, Dynamic Tag Management (DTM). While DTM was a definite improvement over hardcoding tags, it was still clunky and lacked the open, flexible design of what came next.
Since replacing DTM back in 2018, the Adobe Launch extension framework has become the standard. By mid-2023, Adobe reported that over 85% of its analytics customers had made the switch, using extensions to build smoother integrations. The ROI is clear: a Forrester study found companies cut their tag deployment time by 67%—from weeks down to hours—and launched marketing campaigns 40% faster. You can dig into more of Adobe's growth and product stats in this deep dive of their numbers.
Key Takeaway: Extensions aren't just a small feature; they're a fundamental change in how we deploy digital marketing technology. They shift the power to integrate tools from developers to marketers and analysts, making teams much more agile.
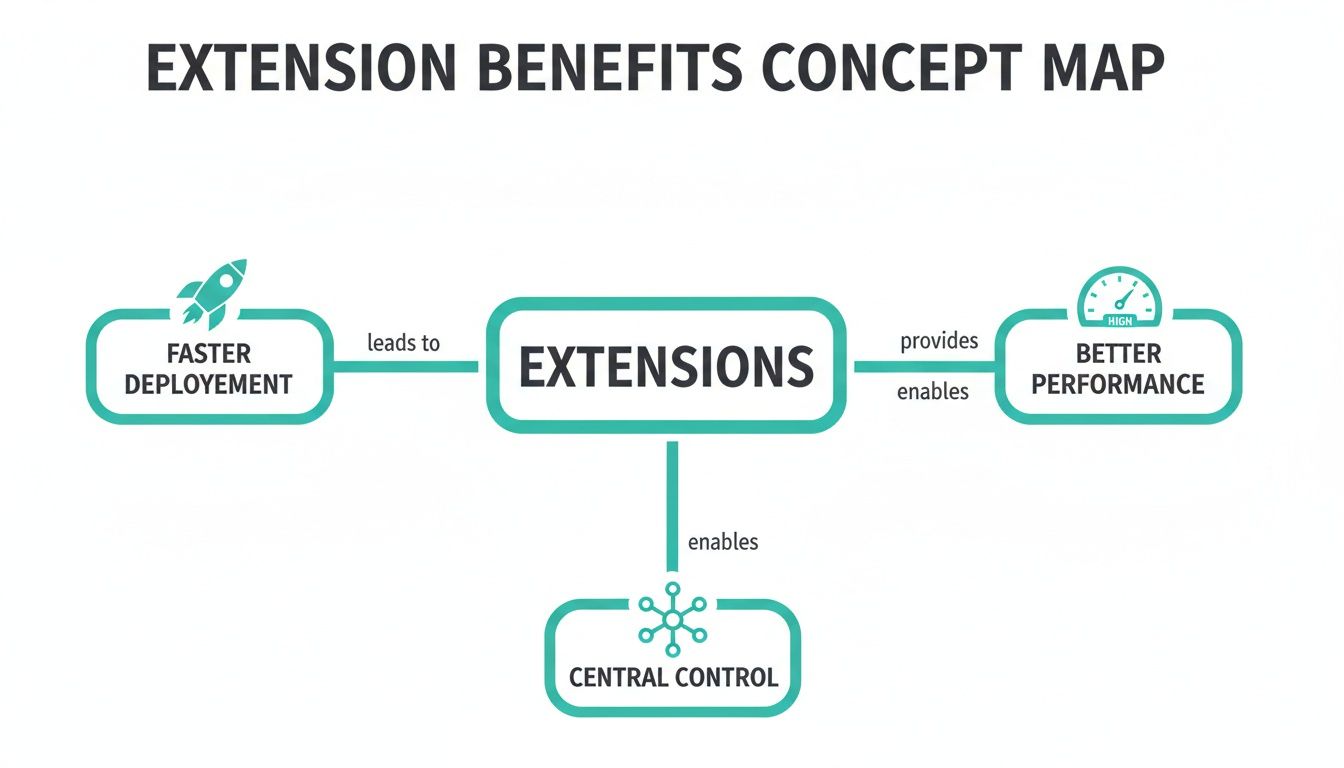
Why Extensions Are a Game Changer
Moving to an extension-based model brings several critical advantages that are non-negotiable for a modern digital business. They form the backbone of an efficient and scalable data strategy.
The table below breaks down the primary advantages that extensions offer for your digital marketing and analytics work.
Core Benefits of Using Adobe Launch Extensions
| Category | Description | Example Use Case |
|---|---|---|
| Speed & Agility | Deploy third-party tools in minutes through a user-friendly interface, bypassing long developer cycles. | Installing and configuring a new A/B testing tool to launch a campaign on the same day. |
| Centralized Control | Manage all your marketing and analytics tags from a single platform, preventing duplication and simplifying governance. | Auditing all active ad pixels on your site from one dashboard before a major campaign. |
| Site Performance | Extensions load scripts asynchronously and efficiently, minimizing the impact on page load times. | Packaging multiple analytics scripts into a single library to reduce network requests and improve UX. |
| Security & Governance | Control exactly what data is shared with vendors, helping you comply with privacy rules like GDPR and CCPA. | Using an extension's settings to block a vendor from collecting personal identifiable information (PII). |
By bundling functionality, extensions streamline everything from deployment to maintenance, giving you a more robust and manageable analytics setup.
Here’s a closer look at those core benefits:
Accelerated Deployment: Instead of getting stuck in a long developer queue for a simple tag, you can install and configure an extension in minutes. This speed lets marketing teams respond to market changes and opportunities almost instantly.
Centralized Control: All your third-party marketing tags live in one place. This "single pane of glass" view stops tag duplication, makes governance straightforward, and provides a clear picture of every tool active on your site.
Improved Site Performance: Extensions are built to load asynchronously and efficiently. By packaging scripts into a unified library, Launch reduces the number of network requests and lightens the load on your page speed, which is vital for both user experience and SEO.
Enhanced Security and Governance: With extensions, you have precise control over the data shared with third-party vendors. This structured system helps prevent unauthorized data collection and makes it far easier to stay compliant with privacy regulations like GDPR and CCPA.
Understanding the Building Blocks of an Extension
At its heart, every rule you build in Adobe Launch follows a simple but powerful logic. Think of it as a basic 'if-then' statement that tells your website what data to capture and when to send it, all without needing a developer to write a single line of custom JavaScript.
To really get your hands dirty with any adobe launch extension, you need to understand its three core components: Events, Conditions, and Actions. These pieces fit together inside what Adobe calls a "Rule."
Events: The 'If'
The Event is your trigger. It's the "if" in the "if-then" logic that starts everything. An event is just a specific user interaction or browser state that you're telling Launch to listen for.
Some common examples are:
- A user clicking a specific button, like "Add to Cart" or "Sign Up Now."
- The page finishing its initial load, often called DOM Ready.
- A user scrolling a certain percentage down the page.
- A video player being paused or hitting a specific timestamp.
Think of the event as the starting pistol for any tracking rule. Without it, the rule simply never runs.
Conditions: The 'And If'
Once an event fires, Adobe Launch moves on to check the Conditions. This is the "and if" part of the sequence. Conditions act as gatekeepers, making sure your rule only runs in the exact context you want it to. They add a layer of specificity that keeps your tags from firing all over the place.
For example, you might have an event that triggers on a button click, but you only want it to fire if specific conditions are met:
- And if the user is on the homepage.
- And if their browser is Google Chrome.
- And if it’s their first time visiting the site.
Conditions are your best friend for refining data collection. They help keep your analytics clean and ensure you’re only capturing truly meaningful interactions.
Actions: The 'Then'
Finally, if the event occurs and all the conditions pass, the Action is executed. This is the "then" part of the statement—it’s the actual job you want to get done. An action is what sends data, shows a message, or even changes something on the page.
Common actions include:
- Then send a page view beacon to Adobe Analytics.
- Then fire a Facebook Pixel for a conversion.
- Then load the script for an A/B testing tool.
- Then set a cookie to remember a user's preference.
Let’s put it all together with a quick, real-world scenario.
Scenario: Tracking a Newsletter Signup
Imagine you want to track every time a user successfully signs up for your newsletter.
- Event (If): The user clicks the "Subscribe" button.
- Condition (And if): The form's confirmation message, "Thank you for subscribing!", is visible on the screen.
- Action (Then): Send an event to Adobe Analytics called
newsletter_signup.
This simple if-then logic is the foundation for every single rule you'll build in Adobe Launch. Getting comfortable with this concept is the key to unlocking the platform's real power. It's also fundamental for managing the information that gets structured in your data layer in Adobe Analytics.
This framework is what allows extensions to deliver faster deployments, improve site performance, and give you central control over your entire marketing tech stack.
By using an adobe launch extension, teams can become much more agile and efficient, moving faster without sacrificing control or data quality.
Your First Adobe Launch Extension Setup Guide
Getting your hands dirty with your first Adobe Launch extension is a lot less daunting than you might think. Adobe has designed the platform to make these integrations feel less like a complex technical project and more like a guided, step-by-step process. To show you what I mean, let's walk through installing a common tool: the Facebook Pixel.
This is a fantastic first exercise. Why? Because the steps we’ll take cover the exact same workflow you'll use for almost any extension. Once you’ve done it once—from finding the tool to telling it when to fire—you'll have the confidence to tackle most basic integrations on your own.
Navigating to the Extension Catalog
Everything starts inside your Adobe Experience Platform Data Collection property. Think of the Extension Catalog as the "app store" for your analytics setup—a library of integrations from Adobe and countless third-party vendors.
Here’s how you get there:
- Log into your Adobe Experience Cloud account and head over to Data Collection.
- Choose the specific property you’re working with.
- On the left navigation menu, click Extensions.
You’ll land on a page showing any extensions you've already installed. To add a new one, just click the Catalog tab at the top. This is where you can search for the "Facebook Pixel" extension or anything else you need.

This catalog is central to the entire Launch workflow. It’s what gives you access to a massive library of pre-built integrations, saving you from the headache of manual coding.
Installing and Configuring the Extension
Found the Facebook Pixel extension? Great. Click "Install." This brings you to the configuration screen, which is where you’ll plug in a few critical details.
This is the most important part of the setup. For the Facebook Pixel, the main thing it needs is your Pixel ID. This unique code is what connects the extension in Launch to your specific Facebook Ads account. You’ll just copy the ID from your Facebook Business Manager and paste it right into the field here.
Pro Tip: Don't hard-code your Pixel ID directly into the configuration. Instead, create a Data Element to hold the ID and reference that Data Element here. It makes future updates way easier—if the ID ever changes, you only have to update it in one place.
After pasting in your Pixel ID (or referencing your Data Element), the default settings are usually fine for a basic setup. Click "Save to Library and Build." This installs the extension into your current working library and gets it ready for the next step.
Building a Rule to Fire the Pixel
Installing an extension makes it available, but it doesn't actually do anything on its own. You have to tell it when and where to activate. We do this by creating a Rule. A classic use case is firing the base pixel on every single page of your site.
Here’s how you build that simple page view rule:
- Head to the Rules section and click "Create New Rule."
- Give your rule a clear, descriptive name. Something like
All Pages - Facebook - Fire Base Pixelwill save you headaches later. Trust me, good naming conventions are a lifesaver. - Under Events, click "Add." Choose the
Coreextension and select theLibrary Loaded (Page Top)event type. This tells Launch to trigger the rule as soon as the library loads on the page. - Now, under Actions, click "Add." Select the
Facebook Pixelextension you just installed. For the Action Type, chooseSend Page View. - Click "Keep Changes" and then "Save to Library and Build."
The way these different components talk to each other is what makes Launch so powerful. If you're looking to understand the mechanics behind these interactions on a deeper level, brushing up on concepts in a good developer's guide to APIs can provide a solid foundation for how these technical integrations work under the hood.
The Publishing Workflow
Your work isn't live just yet. Clicking "Save to Library and Build" bundled your new extension and rule into a Library. Now, that library has to move through your environments to get to your live site.
- Development: This is where you've been working so far.
- Staging/QA: A separate environment where you can test your changes without affecting live users.
- Production: Your live website, where the changes become active for all visitors.
You’ll submit your library for approval, test it in your staging environment (the Adobe Debugger is your best friend here), and once everything checks out, publish it to production. Just like that, your first Adobe Launch extension is live and tracking page views.
Real World Scenarios Powered by Extensions
Theory is great, but let's talk about what Adobe Launch extensions can actually do on the ground. These aren't just technical novelties; they're the tools that solve the messy, real-world problems that marketing and analytics teams face every day.
By looking at a few common situations, you can start to build a playbook for your own organization. Each example follows a simple framework: a familiar business problem, the extension-based solution, and the tangible outcome. It's the perfect way to see how flexible and powerful the extension ecosystem really is.
Unifying Analytics for E-commerce
A classic headache for any e-commerce business is having a splintered view of the customer. Your deep product insights might live in Adobe Analytics, while your marketing team swears by the acquisition reports in Google Analytics. This data silo makes it nearly impossible to get one cohesive picture of the customer journey.
The problem is simple: How do you track crucial e-commerce events like add_to_cart and purchase and send them to both platforms without writing duplicate code or bogging down your site?
This is exactly what extensions were made for. Here’s how it works:
- Set Up Data Elements: First, you define data elements in Adobe Launch to grab the essential e-commerce details from your data layer—things like product ID, price, and quantity.
- Build One Rule: Next, you create a single rule that triggers when a
purchaseevent occurs. - Create Two Actions: Inside that one rule, you set up two separate actions. The first uses the Adobe Analytics extension to map your data elements to your eVars and success events. The second action uses a Google Analytics extension to fire the same data, but formatted for Google’s requirements.
The result is a unified data stream. Your analytics team suddenly has a complete view, with Adobe and Google data sitting side-by-side for comparison. This approach also gives you a fantastic data backup and lets different teams work in the tools they know best, all without creating data gaps. This also opens the door to more advanced architectures, like server-side tagging with Adobe Launch, for even greater control.
Powering A/B Testing and Personalization
Marketers and product managers live and breathe A/B testing to optimize user experiences. But to get reliable results, you have to pipe the experiment and variation data into your analytics platform. Implementing this manually for every single test is tedious and a recipe for human error.
The business challenge is integrating your A/B testing tool—whether it’s Adobe Target, Optimizely, or VWO—so that test data fires cleanly alongside all your other analytics events.
An extension-based solution makes this process almost effortless:
- Install the Extension: Head to the catalog and install the official extension for your A/B testing platform.
- Configure the Connection: Simply add your project ID or account details to link the extension with your tool.
- Let It Run Automatically: The extension now listens for active experiments on the page and pushes the experiment name and variation ID directly into the data layer. From there, a simple rule can capture this info and send it to your analytics platform as custom dimensions.
The outcome is accurate, automated test measurement. Now, every conversion, click, or engagement can be segmented by experiment and variation, giving you statistically sound results you can actually trust.
Managing User Consent with Precision
With privacy laws like GDPR and CCPA, consent management has become non-negotiable. You can no longer just fire tracking pixels at will; you must fire them conditionally, based on a user's explicit choices. Trying to manage this logic manually across dozens of tags is a compliance disaster waiting to happen.
The problem is clear: How do you respect a user’s choices from a Consent Management Platform (CMP) and fire specific tags only when the right consent has been given?
Key Takeaway: An Adobe Launch extension for a CMP acts as the central enforcer of user privacy preferences, ensuring that marketing and analytics tags only activate when consent has been granted for that specific purpose.
This is where CMP extensions are a lifesaver. They integrate directly with platforms like OneTrust, TrustArc, or Cookiebot. The extension reads the user's consent status and makes it available inside Launch.
This allows you to build conditional logic right into your rules. For example, you can add a condition that says, "Only fire the Facebook Pixel if the user has consented to ‘Targeting Cookies.’" The result is stronger compliance and, just as importantly, greater user trust.
Automating Analytics QA with Trackingplan
The Adobe Launch extension framework is incredibly powerful. In just a few clicks, you can deploy sophisticated marketing and analytics tools across your site. But that speed and convenience hide a serious risk: every new extension, rule change, or update is another chance to break your data tracking.
This is where manual QA just can't keep up. No team has the bandwidth to manually inspect every event, property, and pixel after every single deployment. The result is a slow descent into data chaos—broken tracking, mismatched schemas, and rogue events that poison your analytics, burn through ad spend, and completely erode trust in your data.
Moving From Reactive to Proactive Governance
The answer isn't to slow down your release cycle; it's to work smarter with automation. Instead of scrambling to debug an issue after a stakeholder points it out, you need a system that gives you true end-to-end observability. This is exactly what an automated data governance platform like Trackingplan is built for.
Trackingplan integrates directly into your Adobe Launch setup and acts like a dedicated, 24/7 QA engineer. It works silently in the background, providing a crucial safety net for your entire analytics implementation.
Key Insight: Automated QA completely changes the game. It shifts your team's energy from constant firefighting to making confident, data-informed decisions. You get to move fast and actually trust the numbers you're seeing.
Forget waiting for a panicked message about a broken dashboard. With automation, you get an instant alert the moment anything deviates from your tracking plan. This proactive stance is a must-have for any agile, data-driven team. Keeping your data clean is critical, especially for complex analytics setups like GA4 cross-domain measurement, where small errors can lead to huge discrepancies.
How Automated QA Works With Adobe Launch
Getting started with a tool like Trackingplan is surprisingly simple. It deploys its own lightweight tag—using an Adobe Launch extension, naturally—which then automatically discovers and maps your entire tracking implementation from end to end.
Once it's installed, it monitors everything in real-time, constantly scanning for common but devastating issues:
- Schema Mismatches: Instantly spots when an event is fired with missing, extra, or incorrectly formatted properties.
- Broken or Missing Pixels: Alerts you the second a critical marketing or attribution pixel fails to fire when it should.
- Campaign Tagging Errors: Catches malformed UTM parameters or inconsistent campaign naming that can wreck your attribution reports.
- Potential PII Leaks: Flags any events where personally identifiable information might have been accidentally collected, helping you stay compliant.
A 2026 Gartner report notes that 91% of digital teams now see extensions as essential for modern analytics. Yet, Adobe's own data has shown that as many as 41% of extensions can misconfigure consent banners, opening up major compliance risks. This is precisely where automated QA steps in. Platforms like Trackingplan have been proven to auto-detect over 95% of schema mismatches in Launch environments within minutes of being deployed. You can read more about how AI is impacting the industry in this report.
This screenshot shows a perfect real-world example of Trackingplan flagging an issue right in a production environment.

The system pinpointed a "Not Implemented" event. This tells the team that tracking for a key feature was never deployed correctly, leaving a massive blind spot in their data. Finding this automatically allows them to fix the problem long before it ever affects business-critical metrics.
Common Questions About Adobe Launch Extensions
As you start working within the Adobe Launch ecosystem, you'll naturally run into a few recurring questions. I see them pop up all the time. Getting these sorted out early will save you a ton of headaches and help solidify your understanding of how everything fits together.
Let's walk through some of the most common ones I hear.
What Is the Difference Between Adobe Launch and Adobe DTM?
This is probably the most frequent question. The simplest way to put it is that Adobe Launch (now officially called Tags in Adobe Experience Platform) is the modern successor to the older Dynamic Tag Management (DTM).
Think of Launch as the next generation. It was built from the ground up with an open, "app store" style marketplace for Adobe Launch extensions, which gives it far better performance and much more powerful rule-building capabilities. While DTM was a great tool for its time, Launch offers incredible flexibility for integrating third-party tools and supports modern workflows like server-side tagging.
Can I Use a Google Analytics Extension in Adobe Launch?
Yes, you absolutely can. This is one of the biggest strengths of Adobe Launch—its vendor-agnostic extension catalog. You can easily find, install, and configure extensions for a massive list of third-party tools, including Google Analytics, Google Ads, and the Meta Pixel.
This is a huge deal because it lets you send data to multiple platforms from a single, unified implementation. It completely removes the need to clutter your site with redundant code snippets for every new tool you want to try.
How Do I Debug an Adobe Launch Extension?
Your first stop for debugging should always be the Adobe Experience Platform Debugger browser extension. It's an essential tool that I can't work without. It shows you, in real time, which rules are firing and what data is being passed along with them.
If the debugger isn't showing any obvious errors, the next place to look is your rule configuration. Double-check that the Event, Conditions, and Actions are all set up exactly as you intend. After that, verify the extension is actually included in the right Library and has been published to the environment you're testing on.
Are Adobe Launch Extensions Free?
The Launch platform itself is part of your Adobe Experience Cloud license, so there's no extra cost for that. The vast majority of extensions in the catalog, especially those from major players like Google and Meta, are completely free to install and use.
However, some highly specialized extensions developed by third-party vendors might require a separate subscription or a paid license to get all their features. You'll want to check the extension's details in the catalog before you install it, just to be sure.
Managing a complex web of extensions can get tricky, but your data accuracy is non-negotiable. Trackingplan provides complete observability for your analytics, automatically flagging broken tracking and schema errors before they can pollute your data. Get started for free and start trusting your data again.


.avif)